|
||||
|
|
|||
|
||||
|
|
|||
|
Search
Log in
|
ASE-1203 Inductive Soldering Station
Aktakom ASE-1203 soldering station is designed to assemble electronic components. The soldering station contains two blocks with inductive soldering irons used for lead-free soldering. The model is equipped with a digital temperature sensor and supports quick and convenient digital calibration which is protected with the password. ASE-1203 quickly reaches the specified temperature and supports it with high precision.
Features
Technical specifications
Safety instructionsTake care of yourself!
Check and Measure the Soldering IronWhen there is something wrong with soldering iron, you can check and test it. If it is broken, replace the broken element. 1. Checking soldering iron: disconnect the plug and measure the resistance value between the connecting plug pins as follows: 2. If the values of 'a' and 'b' are outside the value in the following table, replace the heating element (sensor) and /or cord assembly. Refer to the following steps.
Note:
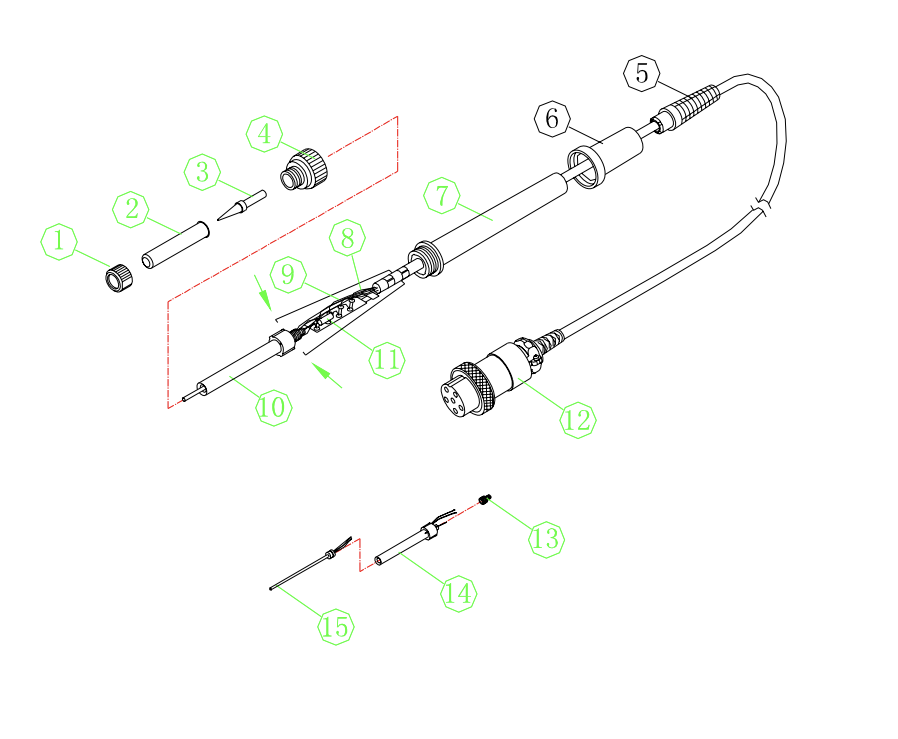
Disassembling the soldering iron1) Turn the nut (1) counterclockwise and remove the tip enclosure (2), and the tip (3). 2) Turn the nipple (4) counterclockwise and remove it from the iron. 3) Pull both the heating element (10) and the cord assembly (11) out of the handle (7). (Toward the tip of the iron). 4) Do not use metal tools such as pliers to remove tip or tip enclosure from the handle.
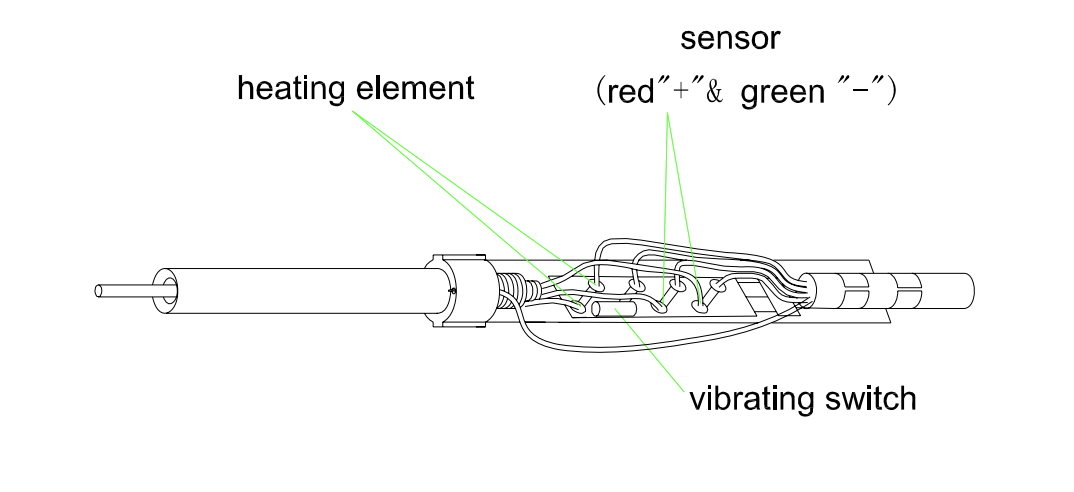
Checking the Heating Element1. Measure the heating element when it comes back to room temperature: 1) Resistance value of heating element under 4Ω. 2) Resistance value of sensor (Red and Grounding wire) under 10Ω.
2. If the resistance value isn't normal, replace the heating element. 3. Testing heating element: 1) Measure the resistance value between pins 4 and 1 or 2, pins 5 and 1 or 2, pins 3 and 1 or 2, pins 3 and 4 or 5. If it is not ∞, the heating element and sensor or vibrator switch are touching. This will damage the PCB. 2) Measure the resistance value a, b and c to confirm that the leads are not twisted and that the grounding wire is properly connected.3) Make sure the spring hook (9) has clasped the heater element (10). ASE-1203: Setting & Operating the UnitUsages of the Sponge and the Iron HolderCAUTION:
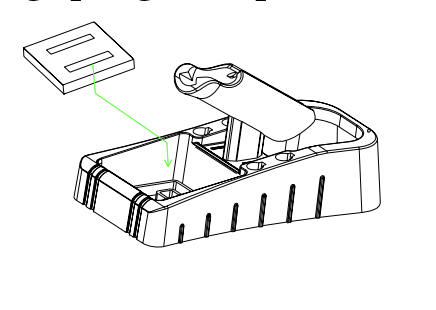
1. Dampen the small cleaning sponge with water and then squeeze it dry. Place it in the iron holder base. 2. Add water to iron holder base. The small sponge will absorb water to keep the large sponge above it wet. 3. The large sponge may be used alone (without small sponge & water). Dampen the large cleaning sponge and place it on the iron holder base.
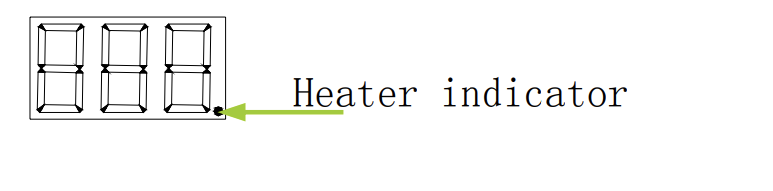
ConnectionsCAUTION: Be sure to turn off the power switch before connecting or disconnecting the soldering iron. Failure to do so may result in damage to the soldering station. 1. Connect the cord assembly to receptacle. 2. Place the soldering iron in the iron holder. 3. Be sure to ground the unit. One end of the unit connects with the grounding hole at the back of the unit, and the other end connects with the earth. 4. Plug the power cord into a power supply. Turn on the power switch. 5. The heater point (the radix points on the 1's right side) flickers when the temperature has stabilized.
Temperature SettingCAUTION: Make sure the temperature of the station can be adjusted (Password is right or the password is initial 000). While setting the temperature normally, the heating element is off. Temperature rising: Press ▲ key directly. If so, the setting temperature will raise 1°C and the display window will display the set temperature. When loosen the ▲ key, the display window will delay the set temperature about 2 seconds. If within 2 seconds, press the ▲ key again, the setting temperature will raise 1°C again. If press the ▲ key and not lose at least 1 second, the setting temperature will rise rapidly. Till the needed temperature reaches, then loose the ▲ key. Temperature dropping: Press ▼ key directly. If so, the setting temperature will drop 1°C and the display window will display the set temperature. When loose the ▼ key, the display window will delay the set temperature about 2 seconds. If 2 seconds later, press the ▼ key again, the setting temperature will drop 1°C again. If press the ▼ key and not lose at least 1 second, the setting temperature will drop rapidly. Till the needed temperature reaches, then loose the ▼ key. Sound Setting1. In the working state and the password is 000 or the inputting password is right, press the four ▲. And ▼ keys at the same time to turn on or off the sound. 2. After turning on the sound, the unit will sound di-di when click the keys. 3. After turning on the sound, the unit will sound (with alarming work state) when the setting temperature is high than the real temperature 150°C during the heating or the setting temperature is less than the real temperature 80°C during the cooling. 4. After turning off the sound, the unit will not sound when clicking the keys or temperature up-limit or down-limit sound. Sleeping1. When the station is in the setting menu status, the display will be show OK. Press the ▲ and ▼ keys at the same time to enter in the sleeping time. And if select 0, it is no sleeping. 2. If sleeping time is selected 1-99, and the soldering iron is not used for 1-99 minutes, the power to the heating element will be decreased, and the display shows. This state is sleeping mode. Press the and ▼ keys to select the sleeping time. 3. When in sleeping mode, the tip temperature will decrease to 200℃ (if the set temperature is more than or equal to 200°C) or 50°C (if the set temperature is less than 200°C) and remain the temperature until resuming the iron. 4. If the soldering iron is not resumed more than 60 minutes after it comes to sleeping, the power supply will be shut off automatically, and the display window will not show anything. 5. To resume soldering, there are several ways as follows: 1) Turn off the power switch, and then turn on again. 2) Take up the iron hand of the sleeping station. 3) Click any button among the keys ▲, ▼ and ON/OFF of the sleeping station. Calibrating the Iron TemperatureThe Soldering Iron should be recalibrated after changing the iron or replacing the heating element or tip. Method of recalibrating temperature: Use the thermometer to calibrate. 1. Set the iron's temperature to a certain value. 2. When the temperature stabilizes, measure the tip's temperature with thermometer and write down the reading. 3. Press the ▲ and ▼ keys not loose and press ON/OFF key simultaneously, the soldering iron enters into calibration mode. 4. At the moment, the digit of LED display temperature is flashing. Press the ▲ and ▼ keys to input the value on the thermometer and then press the ON/OFF key about 1 second. Here, the calibration operation has been finished. 5. If the temperature still has deflection, you can repeat calibration in accordance with above steps.
Parameter SettingThe station has the following parameters setting. Before adjusting the parameter of the unit, it needs to input the right password. Password SettingThe unit's password is one and only and the initial password is 000. The setting temperature is admitted in this status. If need to restrict the setting temperature, the password must be changed and turn off the unit, then turn on. Enter into setting password1. Turn off the power switch, press and hold the ▲ and ▼ buttons simultaneously, then turn on the power switch.
2. Continue holding down the ▲ and ▼ buttons until the display shows
3. When the LED shows Input previous password
4. Press the ON/OFF button, the LED shows Remove scale and oxides from the timed area of the tip with 80-grit abrasive polyurethane foam stock or a 100-grit emery cloth. Selecting the password of three digit, press the ON/OFF button. The input password is error5. If the iron enters normal work state after display shows the current setting temperature for two seconds, this indicates the input password is error, and the temperature setting can't be done. The input password is correct
6. If the window shows Input new password
7. When display window is showing Repeat the new password
8. When three digits are selected, press ON/OFF button, the display window shows 9. If the latest two passwords are the same, pressing ON/OFF button will modify the password successfully. The new password is stored into the memory.
10. If the latest two passwords are not the same, pressing ON/OFF button, and the display window shows Note:
Sleeping Setting
1. When the window displays
2. After select the sleeping time, click the ON/OFF button to save the value into the memory. 3. The sleeping settings of the two work soldering irons are separate and both need to set. After finishing one setting, it needs to repeat the same steps to setting the other. Frequently Asked Questions
Back to the section |
||||||||||||||||||||||||||||||||||||||||||||||||||