How to Output Noise Signals
Press  button to call the user interface of Noise signal, the Noise waveform parameters can be set by operating the Noise setting menu on the right.
The parameters of Noise waveform are: Amplitude/High Level, Offset/Low Level. You can operate the menu by using the menu selection buttons on the right.
To set the Amplitude/High Level, Offset/Low Level, please refer to “How To Output Sine Signals”

How to Output Pulse Signals
Press  button to call the user interface of Pulse signal, the Pulse waveform parameters can be set by operating the Pulse setting menu on the right.
The parameters of Pulse waveform are: Frequency/Period, Amplitude/High Level, Offset/Low Level, Pulse Width/Duty, Edge Time. You can operate the menu by using the menu selection buttons on the right.
To set the Frequency/Period, Amplitude/High Level, Offset/Low Level, please refer to “How To Output Sine Signals”.
The frequency range is 1μHz…25MHz; the period range is 40ns…1Ms.

To Set the Pulse Width/Duty Cycle
1) Press F4 button, the chosen menu item is highlighted, the focused parameter is displayed in Parameter bar 1. Press F4 to switch between Frequency/Period.
2) Turn the knob to change the value directly; or press the number keys to input the desired value and choose the unit.
The Pulse Width is limited by Period. The Duty Cycle range is 0…100%.

To Set the Edge Time
1) Press F5 button, the “Edge Time” menu item is highlighted, the current value of the edge time is displayed in Parameter bar 1.
2) Turn the knob to change the value directly; or press the number keys to input the desired value and choose the unit.
The Edge Time range is 10ns…40% of the Pulse Width.

How to Output Arbitrary Signals
Press  button to call the user interface of Arbitrary signal, the Arbitrary waveform parameters can be set by operating the Arbitrary setting menu on the right.
The parameters of Arbitrary waveform are: Frequency/Period, Amplitude/High Level, Offset/Low Level, Built-in Waveform. You can operate the menu by using the menu selection buttons on the right.
To set the Frequency/Period, Amplitude/High Level, Offset/Low Level, please refer to “How To Output Sine Signals”.
The frequency range is 1μHz…10MHz; the period range is 100ns…1Ms.
The Arbitrary signal consists of two types: the system built-in waveform and the user-definable waveform.

To Select the Built-in Waveform
Press button, then press F4 to enter the Built-in Wform menu.
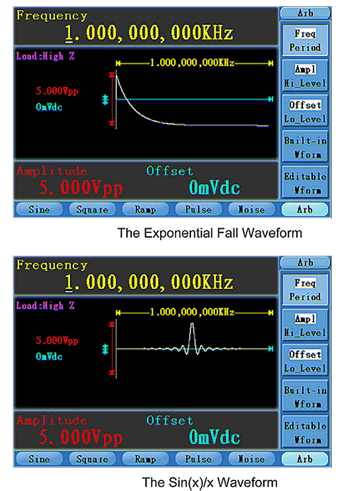
There are three built-in Arbitrary waveforms: Exponential Rise, Exponential Fall, sin(x)/x. The Exponential Rise waveform is shown in the figure above. The Exponential Fall and sin(x)/x waveform are shown in the figure below.
The User-Definable Waveform
Press button and press F5 to select “Editable Wform”.
| Menu item | Instruction |
| Create Wform | Create a new waveform |
| Select Wform | Select the waveform stored in Flash memory. |
| Edit Wform | Edit the stored waveform. |
How to Create a New Waveform
1) Enter the operation menu: Press →Editable Wform →Create Wform.
2) Set the number of waveform points: Press F1 to select “Wform Points”, turn the knob or press the number keys to input the desired value and choose the unit. X1, XK, XM respectively represent 1, 1000, 1000,000. The waveform points range is 2…1000000.
3) Set the interpolation: Press F2 to switch between On/Off. If you choose On, the points will be connected with beelines; otherwise, the voltages between two consecutive points will not change, and the waveform looks like a step-up one.
4) Edit the waveform points: Press F3 to enter the operation menu.
• Press F1 to choose “Points”, input the number of the point to be edited.
• Press F2 to choose “Voltage”, input the voltage for the current point.
• Repeat the step above, set all the points to your needs.
• Press F4 to choose “Store”, enter the file system. If a U disk is connected, press the ← / → direction key to select the storage. “USBDEVICE” is the U Disk storage, “FLASH” is the internal storage. Choose Next level, enter the desired
storage path, choose Save, an input keyboard pops up, input the file name, and then choose DONE.
How to Select a Stored Waveform
1) Enter the operation menu: Press →Editable Wform →Select Wform.
2) Enter the storage path of the desired waveform file. Press the ↑/ ↓ / ← / → direction key to select the desired waveform file.
3) Choose Recall output.
How to Edit a Stored Waveform
1) Enter the operation menu: Press →Editable Wform →Edit Wform.
2) Enter the storage path of the desired waveform file. Press the ↑/ ↓ / ← / → direction key to select the desired waveform file.
3) Choose Recall suppres.
How to Delete a Stored Waveform
1) Enter the operation menu: Press →Editable Wform →Edit Wform.
2) Enter the storage path of the desired waveform file. Press the ↑/ ↓ / ← / → direction key to select the desired waveform file.
3) Choose OK, and then choose Delete
How to Generate the Modulated Waveform
Use the Mod button to generate modulated waveform. AWG-4151 can modulate waveform using AM, FM, PM, FSK and PWM.
AM (Amplitude Modulation)
The modulated waveform consists of two parts: the Carrier Waveform and the Modulating Waveform. The Carrier Waveform can only be Sine. In AM, the amplitude of the Carrier Waveform varies with the instantaneous voltage of the modulating waveform. The user interface of the AM is shown as below.
")
How to set the parameters of AM
1) Press
Mod function button to enter the Modulation mode.
2) Press
F1 to switch
Mod Type to
AM. If the Carrier Waveform is not Sine, the system will switch it to Sine automatically.
3) Press

button to display the waveform and parameters of the Carrier Waveform. You can change the parameters, please refer to “
How To Output Sine Signals”. Press button again to return to the Modulation mode interface.
4) Press
F5 to select the source. If the source is
External, use the
Modulation In connector in the rear panel to input the external signal, the setting of AM is finished. If you choose
Internal, continue to the steps below.
5) Press
F2 to choose
Mod Shape, you can choose Sine, Square or Ramp.
6) Press
F3 to set
AM Frequency. The range is 1μHz…20kHz (Internal source only).
7) Press
F4 to set
Mod Depth. The range is 0%…150%.
FM (Frequency Modulation)
The modulated waveform consists of two parts: the Carrier Waveform and the Modulating Waveform. The Carrier Waveform can only be Sine. In FM, the frequency of the Carrier Waveform varies with the instantaneous voltage of the modulating waveform. The user interface of the FM is shown as below.
")
How to set the parameters of FM
1) Press Mod function button to enter the Modulation mode.
2) Press F1 to switch Mod Type to FM. If the Carrier Waveform is not Sine, the system will switch it to Sine automatically.
3) Press button to display the waveform and parameters of the Carrier Waveform. You can change the parameters, please refer to “How To Output Sine Signals”. Press button again to return to the Modulation mode interface.
4) Press F5 to select the source. If the source is External, use the Modulation In connector in the rear panel to input the external signal, then skip ahead to step (6). If you choose Internal, continue to the steps below.
5) Press F2 to choose Mod Shape, you can choose Sine, Square or Ramp.
6) Press F3 to set Mod Frequency. The range is 1μHz…20kHz (Internal source only).
7) Press F4 to set FM Deviation. The Deviation should be less than the Carrier Waveform Frequency.
Note: The Sum of the Deviation and the Carrier Frequency should be equal to or less than maximum frequency of the selected function plus 1kHz.
For an External Source, the Deviation is controlled by the voltage Level of the signal connected to the Modulation In connector in the rear panel. +5V corresponds to the selected Deviation and -5V to the negative selected Deviation.
PM (Phase Modulation)
The modulated waveform consists of two parts: the Carrier Waveform and the Modulating Waveform. The Carrier Waveform can only be Sine. In PM, the phase of the Carrier Waveform varies with the instantaneous voltage level of the modulating waveform. The user interface of the PM is shown as below.
")
How to set the parameters of PM
1) Press Mod function button to enter the Modulation mode.
2) Press F1 to switch Mod Type to PM. If the Carrier Waveform is not Sine, the system will switch it to Sine automatically.
3) Press button to display the waveform and parameters of the Carrier Waveform. You can change the parameters, please refer to “How To Output Sine Signals”. Press button again to return to the Modulation mode interface.
4) Press F5 to select the source. If the source is External, use the Modulation In connector in the rear panel to input the external signal, then skip ahead to step (6). If you choose Internal, continue to the steps below.
5) Press F2 to choose Mod Shape, you can choose Sine, Square or Ramp.
6) Press F3 to set PM Frequency. The range is 1μHz…20kHz (Internal source only).
7) Press F4 to set Phase Deviation. The Phase Deviation between the Modulating
Waveform and the Carrier Waveform ranging from 0° to 180°.
FSK (Frequency Shift Keying)
The FSK Modulation is a modulation method, the output frequency of which switches between two the pre-set frequencies (Carrier Waveform Frequency and the Hop Frequency). The Frequency of the Output Frequency switch between the carrier waveform frequency and the Hop frequency is called the FSK rate. The frequency by which the output frequency switch from each other is determined by the Internal Frequency generator or the Signal Voltage Level offered by the Ext Trig/FSK/Burst connector in the rear panel. The Carrier Waveform can only be Sine. The user interface of the FSK is shown as below.
")
How to set the parameters of FSK
1) Press Mod function button to enter the Modulation mode.
2) Press F1 to switch Mod Type to FSK. If the Carrier Waveform is not Sine, the system will switch it to Sine automatically.
3) Press button to display the waveform and parameters of the Carrier Waveform. You can change the parameters, please refer to “How To Output Sine Signals”. Press button again to return to the Modulation mode interface.
4) Press F5 to select the source. If the source is External, use the Ext Trig/FSK/Burst connector in the rear panel to input the external signal, then skip ahead to step (5). If you choose Internal, continue to the steps below.
5) Press F3 to set FSK Rate. The range is 1μHz…100kHz (Internal source only).
6) Press F4 to set Hop Frequency. The range is 1μHz…25kHz.
PWM (Pulse Width Modulation)
The modulated waveform consists of two parts: the Carrier Waveform and the Modulating Waveform. PWM can only be used for pulse modulation, so the Carrier Waveform must be Pulse. In PWM, the width of the Carrier Waveform (Pulse) varies with the instantaneous voltage of the modulating waveform. The user interface of the PWM is shown as below.
")
How to set the parameters of FSK
1) Press Mod function button to enter the Modulation mode.
2) Press F1 to switch Mod Type to PWM. If the Carrier Waveform is not Pulse, the system will switch it to Pulse automatically.
3) Press button to display the waveform and parameters of the Carrier Waveform. You can change the parameters, please refer to “How To Output Pulse Signals”. Press button again to return to the Modulation mode interface.
4) Press F5 to select the source. If the source is External, use the Modulation In connector in the rear panel to input the external signal, then skip ahead to step (6). If you choose Internal, continue to the steps below.
5) Press F2 to choose Mod Shape, you can choose Sine, Square or Ramp.
6) Press F3 to set Mod Frequency. The range is 1μHz…20kHz (Internal source only).
7) Press F4 to set Width Deviation/Duty Deviation (depends on the P_Width/Duty menu item of the Pulse setting menu when you exit the Modulation mode). The maximum range of the Duty Deviation is the smaller one in [Pulse Duty, 1-Pulse Duty]. The maximum range of the Width Deviation is Pulse Width.
How to Generate Sweep
In the frequency sweep mode, the generator “steps” from the start frequency to the stop frequency at the sweep rate you specify. Sweep can be generated by Sine, Square or Ramp Waveforms.

How to set the parameters of Sweep
1) When the output signal is Sine, Square or Ramp waveform, press Sweep function button to enter the Sweep mode.
2) Press  ,
,  or
or  button to choose the waveforms. Take Sine for instance, press to display the waveform and parameters. You can change the parameters, please refer to “How To set signals” . Press button again to
return to the Sweep mode interface.
3) Press F1 to set Sweep Time, the Time Span of the Sweep for which the Frequency changes from the Start Frequency to Stop Frequency.
4) Press F2 to select the Sweep Type. Linear means setting the Sweep with linear spacing; Log means setting the Sweep with logarithmic spacing.
5) Use Start Freq and Stop Freq or Center Freq and Freq Span to set the range of the frequency. Press F3 to select Sta_Freq or Cen_Freq, and set the desired value.
6) Press F4 to select StopFreq or FreqSpan, and set the desired value.
7) Press F5 to select NextPage, press it again to enter the next page.
8) Press F1 to select the source. Internal means using the internal source. External means using the Ext Trig/FSK/Burst connector in the rear panel to input the external signal. Manual means using the external source, set the start and stop time by hand.
How to Generate Burst
Using Burst function button can generate versatile waveforms in burst. Burst can last for certain times of waveform cycle (N-Cycle Burst), or to be controlled by external gated signals (Gated Burst). Bust can apply to Sine, Square, Ramp, Pulse and Arbitrary waveforms (Noise can not be used).
Note: For a burst, the maximum frequency of the used waveform is 25MHz. After pressing the Burst function button, if the frequency is greater than 25MHz, the generator will adjust it to 25MHz automatically.
Set the N-Cycle Burst

1) When the output signal is Sine, Square, Ramp, Pulse or Arbitrary waveform, press
Burst function button to enter the Burst mode.
2) Press
,
,
,
or
button to choose the waveform. Take Sine for instance, press
to display the waveform and parameters. You can change the parameters, please refer to “How to set signals”. Press
button again to return to the Burst mode interface.
3) Press
F4 to switch to
N Cycle.
4) Press
F1 to select
Burst Period, set it to the desired value.
5) Press
F3 to select
Start Phase, define the Start and the Stop Point in a waveform. The phase varies from -360° to +360°. For an Arbitrary Waveform, 0° is the first waveform point.
6) Press
F2 to select
Delay, set the Time Delay between the Trigger Input and the Start of the N-Cycle Burst. The minimum delay is a function of the specific burst period, and should always be greater than 0s.
7) Press
F5 to select
NextPage, press it again to enter the next page.
8) Press
F1 to select
Cycles or
Infinite. Set the number of Waveform Cycle in an N-Cycle (from 1 to 50000). If you choose Infinite, then a continuous waveform will be generated which will not stop until a trigger event happens (
Trigger button is pressed).
Note: If needed, Burst Period will increase to cater to the specific number of cycles. For an infinite-cycle Burst, External or Manual Trigger is needed to activate burst.
9) Press
F2 to select the source.
Internal means using the internal source.
External means using the
Ext Trig/FSK/Burst connector in the rear panel to input the external signal.
Manual means using the external source, set the start and stop time by hand.
Set the Gated Burst

1) When the output signal is Sine, Square, Ramp, Pulse or Arbitrary waveform, press Burst function button to enter the Burst mode.
2) Press , , , or button to choose the waveforms. Take Sine for instance, press to display the waveform and parameters. You can change the parameters, please refer to “To set signals” . Press button again to return to the Burst mode interface.
3) Press F4 to switch to Gated.
4) Press F3 to select Start Phase, define the Start and the Stop Point in a waveform. The phase varies from -360° to +360°. For an Arbitrary Waveform, 0° is the first waveform point.
5) Press F5 to switch between Positive/Negative. Set the Polarity for the Gated Signal.
How to Output Ramp Signals
Press button to call the user interface of Ramp signal, the Ramp waveform parameters can be set by operating the Ramp setting menu on the right.
The parameters of Ramp waveform are: Frequency/Period, Amplitude/High Level, Offset/Low Level, Symmetry. You can operate the menu by using the menu selection buttons on the right.
To set the Frequency/Period, Amplitude/High Level, Offset/Low Level, please refer to “To Output Sine Signals”.
The frequency range is 1μHz…1MHz; the period range is 1μs…1Ms.

To Set the Symmetry
1) Press F4 button, the "Symmetry" menu item is highlighted, the current value of the symmetry is displayed in Parameter bar 1.
2) Turn the knob to change the value directly; or press the number keys to input the desired value, press F4 to choose "%".
The symmetry range is 0%…100%.

How to Output Sine Signals
Press button to call the user interface of Sine signal, the Sine waveform parameters can be set by operating the Sine setting menu on the right.
The parameters of Sine waveform are: Frequency/Period, Amplitude/High Level, Offset/Low Level. You can operate the menu by using the menu selection buttons on the right.

To Set the Frequency/Period
Press F1 button, the chosen menu item is highlighted, the focused parameter is displayed in Parameter bar 1. Press F1 button to switch between Frequency/Period.
Two methods to change the chosen parameter:
- Turn the knob to change the value of cursor position in the Parameter bar. Press the ←/→ direction key to move the cursor.
- Press a number key in the front panel, an input box will pop up; keep going to input the value. Press the ← direction key to delete the last number. Press F1 … F3 to choose the unit, or press F4 to go to next page and choose other units. Press F5 to cancel the input.
The frequency range is 1μHz…150MHz; the period range is 6.7ns…1Ms.

To Set the Amplitude
Press
F2, confirm whether the “
Ampl” menu item is highlighted; if not, press
F2 to switch into “
Ampl”. In the Parameter bar 2, a cursor appears under the value of amplitude. Use the
knob or the number keys to set the desired value.
To Set the Offset
Press
F3, confirm whether the “
Offset” menu item is highlighted; if not, press
F3 to switch into “
Offset”. In the Parameter bar 2, a cursor appears under the value of offset. Use the knob or the number keys to set the desired value.
To Set the High Level
Press
F2, confirm whether the “
Hi_Level” menu item is highlighted; if not, press
F2 to switch into “Hi_Level”. In the Parameter bar 2, a cursor appears under the value of amplitude. Use the knob or the number keys to set the desired value.
To Set the Low Level
Press
F3, confirm whether the “
Lo_Level” menu item is highlighted; if not, press
F3 to switch into “
Lo_Level”. In the Parameter bar 2, a cursor appears under the value of offset. Use the knob or the number keys to set the desired value.
How to Output Square Signals
Press button to call the user interface of Square signal, the Square waveform parameters can be set by operating the Square setting menu on the right.
The parameters of Square waveform are: Frequency/Period, Amplitude/High Level, Offset/Low Level, Duty. You can operate the menu by using the menu selection buttons on the right.
To set the Frequency/Period, Amplitude/High Level, Offset/Low Level, please refer to "To Output Sine Signals".
The frequency range is 1μHz…50MHz; the period range is 20ns…1Ms.

To Set the Duty Cycle
1) Press F4 button, the "Duty" menu item is highlighted, the current value of the. Duty cycle is displayed in Parameter bar 1.
2) Turn the knob to change the value directly; or press the number keys to input the desired value, press F4 to choose "5".
For a frequency ≤25MHz, the Duty cycle range is 20%…80%. For a frequency greater than 25MHz, the Duty cycle is 50%.