|
|
ASE-3101 Soldering & Desoldering station
ASE-3101 Soldering & Desoldering station
|
|
Assembling-disassembling professional model with digital temperature indication, soldering iron temperature range 390 °F — 930 °F, desoldering iron temperature range 570 °F — 840 °F
Manuals:
|
|
Assembling-disassembling professional model with digital temperature indication
Advantages
- Two channels for assembling and disassembling items during repair
- The ergonomic design of the soldering iron handle provides convenient work
- Digital temperature indication
- The temperature control scheme provides high precision with accuracy not more than
2 °F from the set temperature
- Simplicity of calibration: controllers are located on the station front panel
- The power saving scheme: if the disassembling soldering iron isn’t used for more than 10 minutes, the temperature automatically decreases that prolongs service life of the heater and the tips
- The device of power supplies of soldering irons is isolated from an alternating current network
- For the heating element supply the voltage of 24 V is used
- High-quality and durable ceramic heating element, produced in Japan, provides quick heating
Specifications
STATION
AC Input 110 — 120 V, 60 Hz
Dimensions 9,4 × 8,7 × 6,7 in
Weight 14,3 lb
SOLDERING IRON
Power Consumption 24 V/60 W
Heating element Ceramic heater
Desoldering iron Temperature Range 570 °F — 840 °F
Soldering iron Temperature Range 390 °F — 930 °F
Ceramic heater insulation rated over 100 MΩ at 750 °F
Accessories
- Soldering station
- Desoldering iron with tip
- Soldering iron with tip
- Desoldering iron holder
- Soldering iron holder
- Sliding tray for sponge
- User manual
- Power cable
| ASE-3101 Soldering & Desoldering station - Side view |
|
|
| ASE-3101 Soldering & Desoldering station - Rear view |
|
|
| ASE-3101 Soldering & Desoldering station - Desoldering iron |
|
|
|
| ASE-3101 Soldering & Desoldering station - Soldering iron holder |
|
|
| ASE-3101 Soldering & Desoldering station - Soldering iron holder |
|
|
| ASE-3101 Soldering & Desoldering station - Solder tank |
|
|
|
| ASE-3101 Soldering & Desoldering station - Tray for sponge |
|
|
| ASE-3101 Soldering & Desoldering station - Desoldering iron holder |
|
|
Safety instructions
Take care of yourself!
- Please read user manual carefully before using the instrument.
- Do not use the device if there is visible damage.
- Repair and maintenance of the device can be done only by a qualified specialist of the service center.
- Before connecting the instrument to the electrical network, observe all known precautions, and make sure that the grounding system is to avoid electric shock.
- Use only those accessories that are intended for use with this device.
- While working, do not touch the metal parts near the tip of the soldering iron.
- After completion of the work, it is necessary to install the soldering gun in the regular holder of the soldering gun.
Prestarting procedure ASE-3101
Soldering iron connection
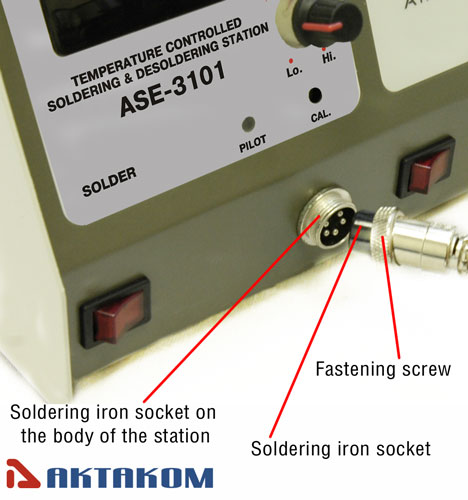
- Connect the soldering iron to the socket on the body of the station. There to connect the slots of the soldering iron socket with the socket pins on the body of the station.
- After that firmly tighten the fastening screw on the soldering iron socket by turning it clockwise.
Desoldering iron connection
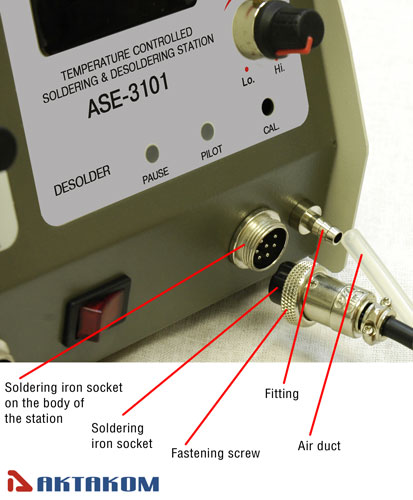
- Connect the desoldering iron to the socket on the body of the station. There to connect the slots of the desoldering iron socket with the socket pins on the body of the station.
- After that firmly tighten the fastening screw on the desoldering iron socket by turning it clockwise.
- Stretch the air duct of the desoldering iron on the air duct fitting of the desoldering channel compressor.
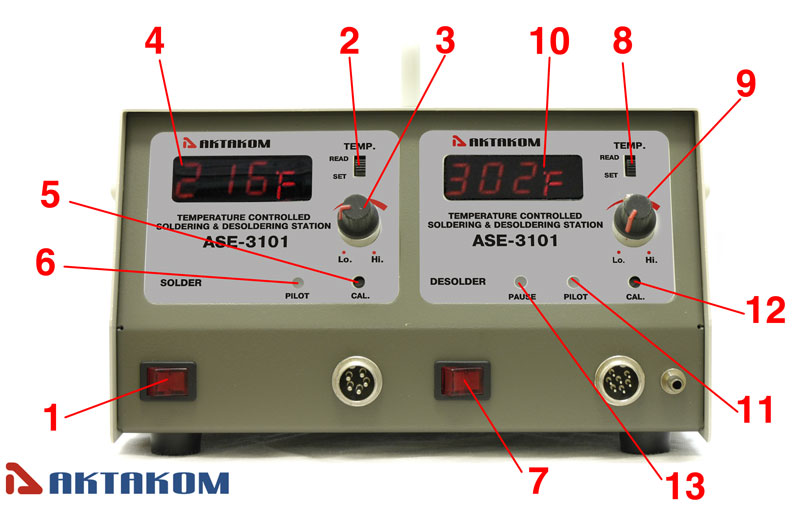
Soldering Channel
- Switch on a soldering channel (1).
- Then move the selector "Temperature" (2) in position "Set" and set required temperature with the help of rotary knob (3).
- The settable temperature will be shown on a display (4).
- If you raise the temperature, the temperature pilot light "Pilot" (5) flashes red.
- If you reduce the temperature, the temperature pilot light "Pilot" (5) flashes green.
- After setting required temperature, move the selector (2) in position “Read” in order the required temperature to be fixed and maintained.
- In the process the current temperature of the soldering tip appears on a display and starts gradually changing until reaches the set point of temperature.
- On reaching the set point of temperature the temperature pilot light "Pilot" (5) starts flashing red and green by turns, and the value of temperature is fixed on a display.
- With the help of adjusting screw "Cal" (6) you can execute calibration of temperature of soldering channel.
For calibration of soldering channel the following tools are used:
- Calibrated thermometer with adjusted thermocouple.
- Ceramic screwdriver.
Operational procedure:
- Fix the selector "Temp"(2) in position "Set".
- Fix the rotary knob regulating temperature (3) on the value 315°C (599°F).
- Move the selector "Temp" in position "Read".
- Wait until the soldering station warms-up (2-3 minutes). In the process the values 315°C (599°F) appear on a digital display (4) of the soldering station and the temperature pilot light "Pilot" (5) starts flashing red and green by turns.
- Take the solder droplet on the tip of soldering iron.
- Fix the soldering iron vertically on the cross of thermocouple of calibrated thermometer. Clamping force should be produced by the sole weight of the soldering iron. It is expressly prohibited to apply additional force in order to avoid mechanical damage (break) of thermocouple.
- On setting values take the measured value of temperature from the digital display of calibrated thermometer.
- In case of departure of temperature from the value 315°C (599°F) over 5°C (41°F) it has to execute calibration procedure of soldering channel.
- Steplessly turn adjusting screw "Cal" (5) on the faceplate of the station by a ceramic screwdriver until the values on a digital display reach 315 ± 2°C (599±35°F). It is to bear on mind that after turning the adjusting screw, temperature of soldering tip changes slowly. That is why this operation has to be performed deliberately. Be attentive and control changes of temperature on the digital display of thermometer.
Even if it seems that values of temperature are fixed, it has to wait for 20-30 seconds in order to be assured that the temperature is definitely fixed.
Desoldering Channel
-
Switch on a desoldering channel (7). Then move the selector "Temp" (8) in position "Set" and set the required temperature with the help of rotary knob (9).
-
The settable temperature will be shown on a display (10).
-
If you raise the temperature, the temperature pilot light "Pilot"(11) flashes red. If you reduce the temperature, the temperature pilot light "Pilot" (11) flashes green.
-
On setting the required temperature, move the selector (6) in position "Read" in order the required temperature to be fixed and maintained.
-
In the process the current temperature of the desoldering tip appears on a display and starts gradually changing until reaches the set point of temperature.
-
On reaching the set point of temperature the temperature pilot light "Pilot" (11) starts flashing red and green by turns, and the value of set point of temperature is fixed on a display.
-
If powered desoldering iron is not in use for a long period of time (over 5 minutes) the indicator "Pause" (13) flashes in green. After pressing the trigger of desoldering iron the compressor of desoldering channel starts working and the indicator "Pause" (13) goes out.
-
With the help of adjusting screw "Cal" (12) you can execute calibration of temperature of desoldering channel.
For calibration of desoldering channel the following tools are used:
- Calibrated thermometer with the adjusted thermocouple.
- Ceramic screwdriver.
Operational procedure:
- Fix the selector "Temp"(6) in position "Set".
- Fix the rotary knob regulating temperature (7) on the value 315°C (599°F).
- Move the selector "Temp" (6) in position "Read".
- Wait until the desoldering station warms-up (3-5 minutes). In the process the values 315°C (599°F) appear on a digital display (8) of the desoldering station and the temperature pilot light "Pilot" (5) starts flashing red and green by turns.
- Fix the desoldering iron vertically on the cross of thermocouple of calibrated thermometer. Clamping force should be produced by the sole weight of the desoldering iron. It is expressly prohibited to apply additional force in order to avoid mechanical damage (break) of thermocouple.
- On setting values take the measured value of the temperature from the digital display of calibrated thermometer.
- In case of departure of temperature from the values 315°C (599°F) over 5°C (41°F) it has to execute calibration procedure of desoldering channel.
- Steplessly turn adjusting screw "Cal" (12) on the faceplate of the station by a ceramic screwdriver until the values on a digital display reach 315 ± 2°C (599±35°F). It is to bear on mind that after turning the adjusting screw, temperature of soldering tip changes slowly. That is why this operation has to be performed deliberately. Be attentive and control changes of temperature on the digital display of thermometer.
Even if it seems that the values of temperature are fixed, it has to wait for 20-30 seconds in order to be assured that the temperature is definitely fixed.
Frequently Asked Questions
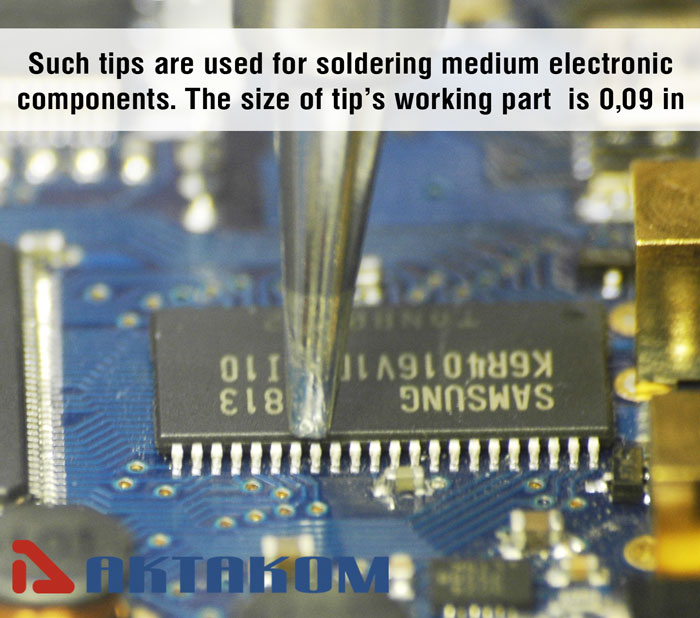
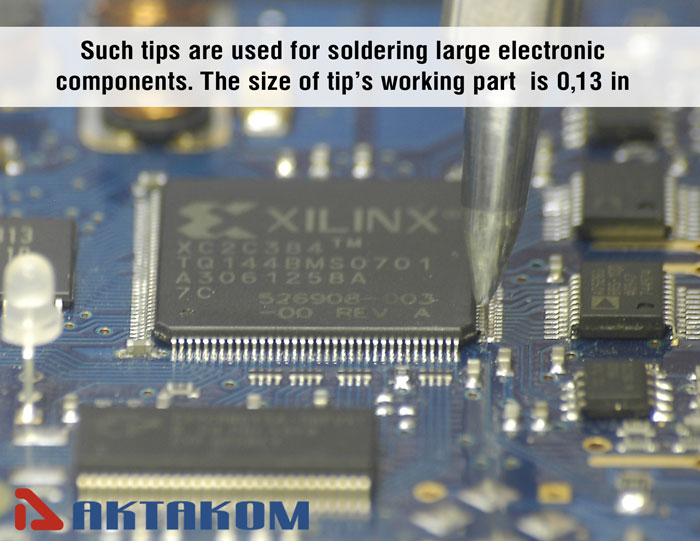
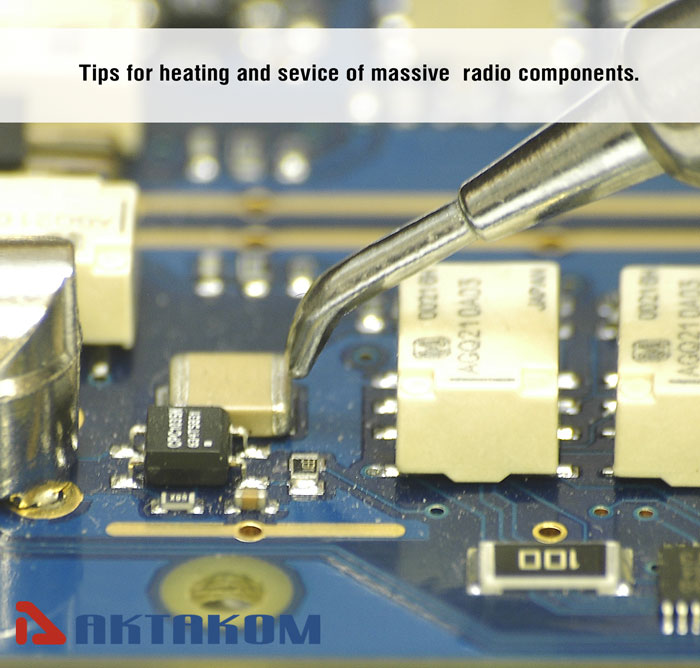
What types of tips I can buy for soldering iron?
How ASE-3101 is designed?
How to care and use of the soldering tip?
How to clean the tip?
What temperature should use for soldering?
Why a "de-tinned" tip fails to work?
Desoldering station has a motor running and is extremely loud
| What types of tips I can buy for soldering iron? |
90M-T-0,8D Soldering Tip 90M-T-1,2D Soldering Tip 90M-T-1,6D Soldering Tip
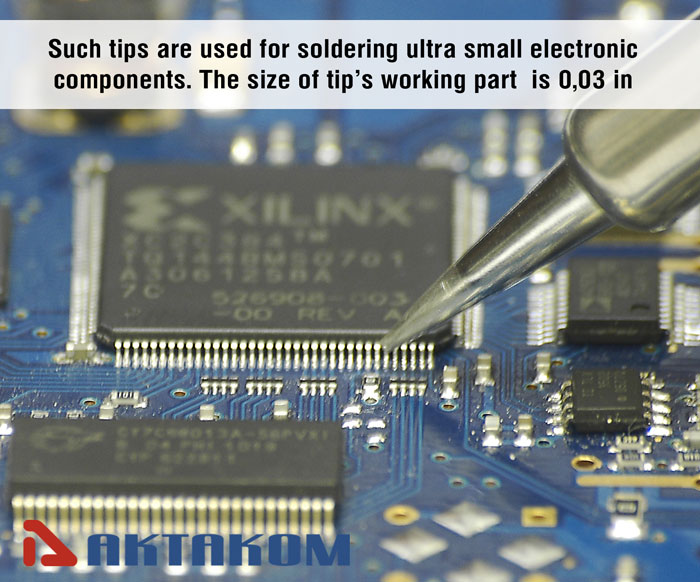  
90M-T-2,4D Soldering Tip 90M-T-3,2D Soldering Tip
90M-T-0,8C Soldering Tip
/ 90M-T-B Soldering Tip 90M-T-1,2D Soldering Tip
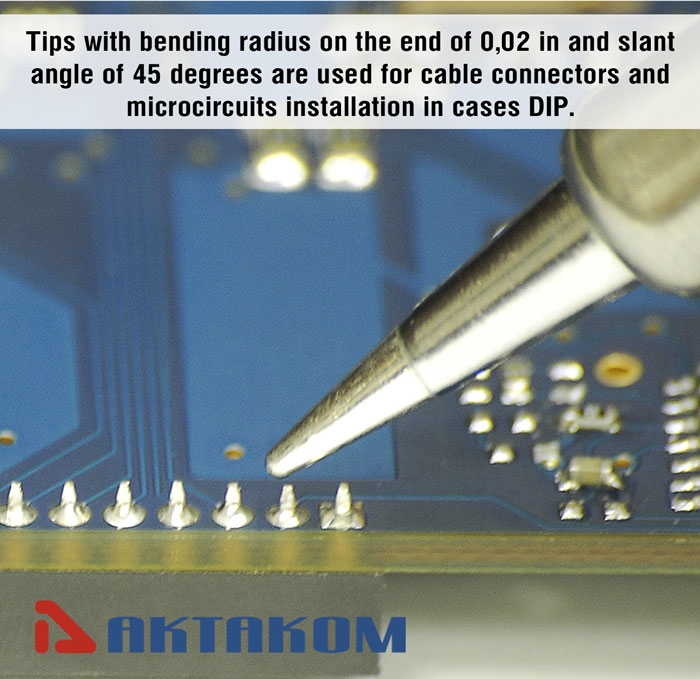 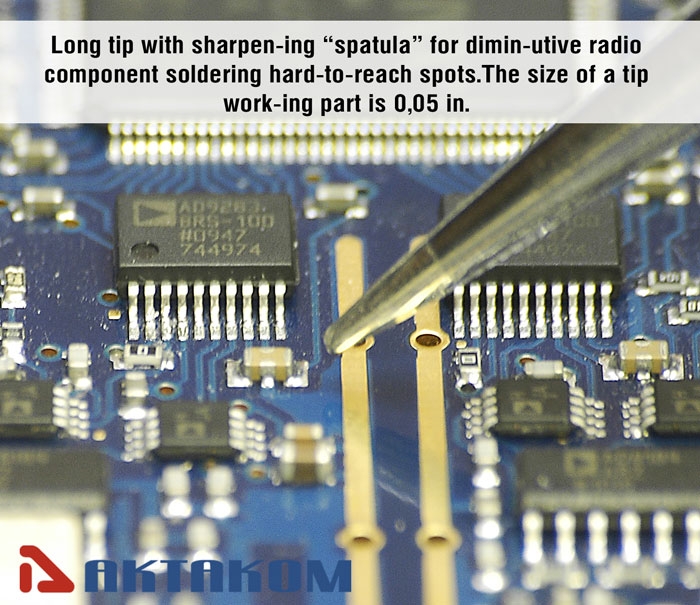
90M-T-I Soldering Tip / 90M-T-LB Soldering Tip
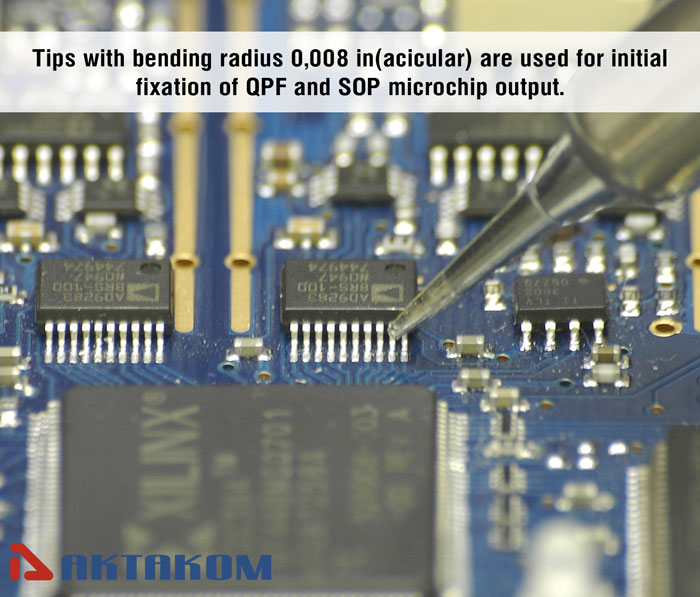
90M-T-2C Soldering Tip 90M-T-3C Soldering Tip 90M-T-4C Soldering Tip
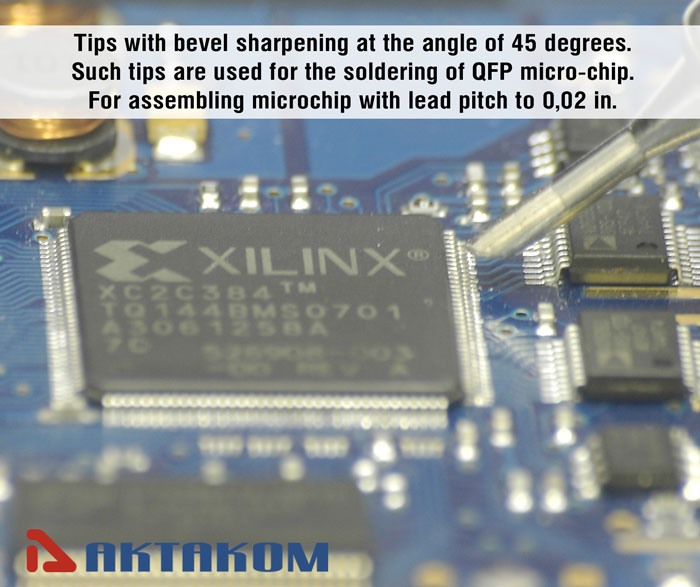 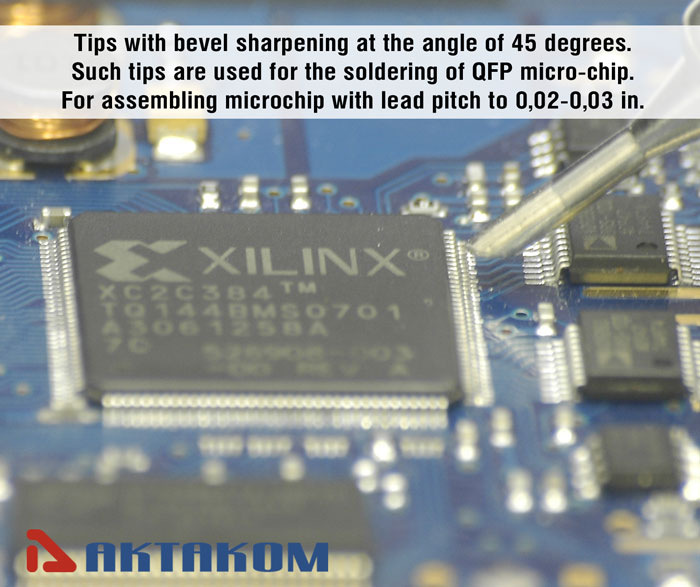 
90M-T-K Soldering Tip

90M-T-1,8H Soldering Tip 90M-T-H Soldering Tip
Up
|
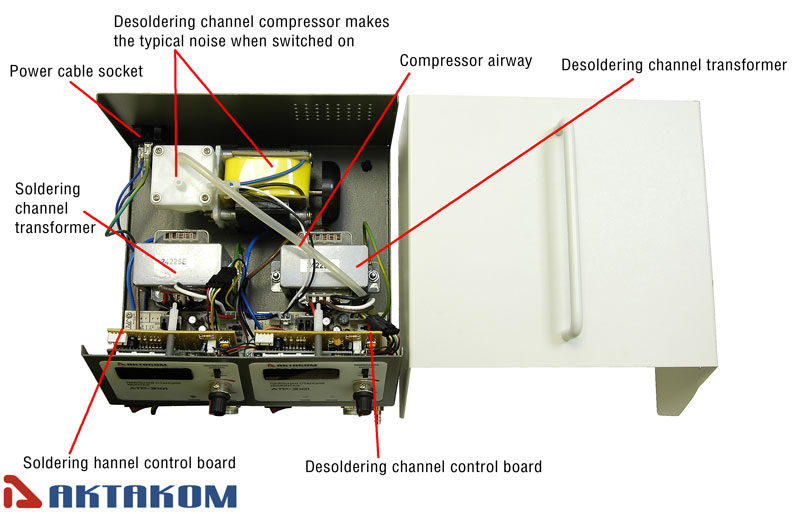
| How ASE-3101 is designed? |
|
Up
|
| How to care and use of the soldering tip? |
|
High soldering temperatures can degrade the tip. Use the lowest possible soldering temperature. The excellent thermal recovery characteristics ensure efficient and effective soldering event at low temperatures. This also protects the sensitive components from thermal damage. Clean the tip regularly with a cleaning sponge, as oxides and carbides from the solder and flux can form impurities on the tip. These impurities can result in defective joints or reduce the tip's heat conductivity. When using the soldering iron continuously, be sure to loosen the tip and remove all oxides least once a week. This helps to prevent reduction of the tip temperature. Never leave the soldering iron sitting at high temperature for long periods of time, as the tip's solder plating will be covered with oxide, which can greatly reduce the tip's heat conductivity. Wipe the tip and coat it with fresh solder after use. This helps to prevent tip oxidation.
Up
|
| How to clean the tip? |
|
Caution! Never file the tip to remove oxide.
- Set the temperature to 250°C.
- When the temperature stabilizes, clean the tip with the cleaning sponge and check the condition of the tip.
- If there is black oxide on the solder-plated portion of the tip, apply new solder (containing flux) and wipe the tip on the cleaning sponge. Repeat until the oxide is completely removed. Coat with new solder. The solder protects the tip from oxidation and prolongs the life of the tip.
- If the tip is deformed or heavily eroded, replace it with a new one.
Up
|
| What temperature should use for soldering? |
600°- 650°F (316°- 343°C) is a good place to start for lead-based solder and 650°- 700°F (343°- 371°C) for lead-free solder.
Note: if clots form, the temperature is too low.
Up
|
| Why a "de-tinned" tip fails to work? |
|
A de-tinned tip is one which cannot wet with solder. This exposes the plating to oxidation and degrades the heat transfer efficiency of the tip.
The de-tinning is caused by:
1) Failure to keep the tip covered with fresh solder while not in use.
2) High tip temperatures.
3) Insufficient melting in soldering operations.
4) Wiping the tip on dirty or dry sponges and rags (Always use a clean, wet, industrial grade, sulfur-free sponge).
5) Impurities in the solder, iron plating, or on the surfaces to be soldered.
Up
|
| Desoldering station has a motor running and is extremely loud |
|
Probably you are using a desoldering gun in a wrong way.
When you pull the trigger the vacuum compressor works to clean desoldering area; giving a natural compressor noise but if you do not pull the trigger the gun will hold the screen temperature as long as the power switch is on (the screen lights). Some station model comes with a the power saving scheme that allow temperature automatically decreases that prolongs service life of the heater and the tips.
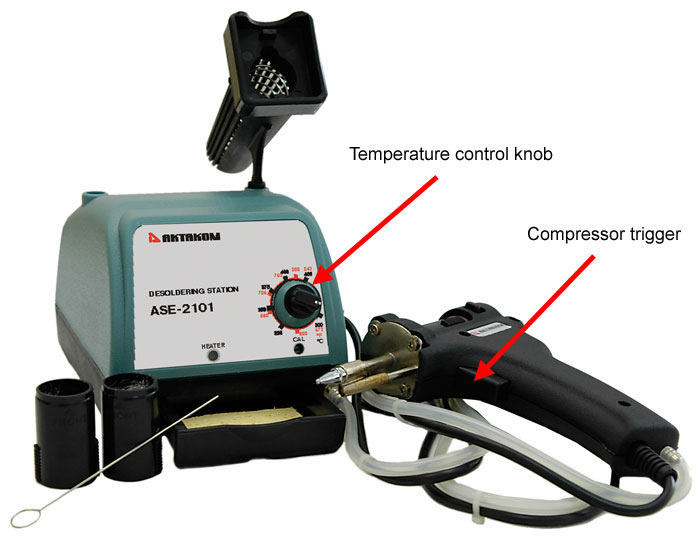 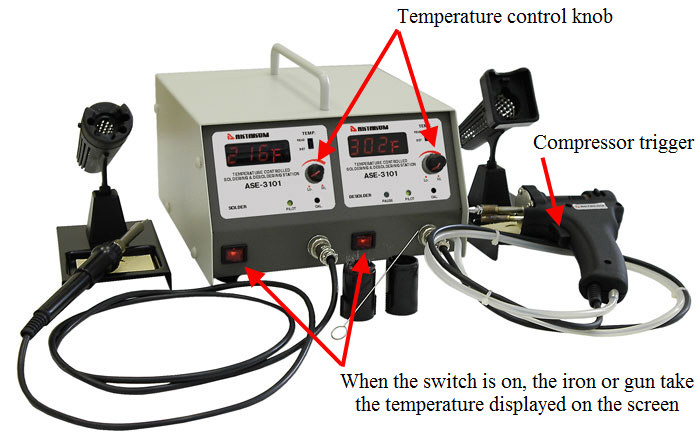
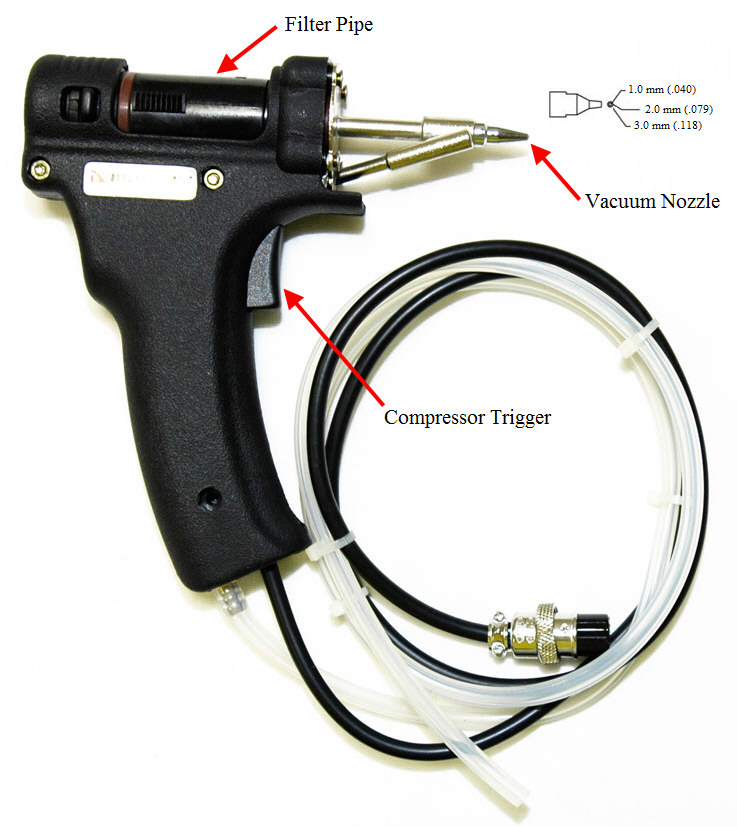
This is not a soldering gun; the trigger is use only to vacuum disordering materials to the filter pipe. The compressor produces a sound level of 87 dBA at work.
Up
|
Back to the section
|
|


