|
|
ATE-6006 Laser Photo/Contact Tachometer
ATE-6006 Laser Photo/Contact Tachometer
|
|
Multi-functions, one instrument combine Photo Tach.( RPM ) & Contact Tach. ( RPM, m/min., ft/min. ). Laser light source, long detecting distance. The last value, max., value, min. value will be stored into the memory automatically & can be obtained by pressing Memory Call Button. The housing cabinet has been carefully shaped to fit comfortable in either hand. Measurement & Range: Photo Tachometer : 10 to 99,999 RPM. Contact Tachometer : 0.5 to 19,999 RPM. Surface Speed : m/min. - 0.05 to 1,999.9 m/min., ft/min. - 0.2 to 6,560 ft/min. Resolution: 0.1/1 RPM, 0.01 / 0.1 m/min. Display 5 digits, 10 mm ( 0.4" ) LCD. Accuracy ± ( 0.05% + 1 digit ), RPM only. Detecting distance: 5 cm to 200 cm typically.
Manuals:
|
|
AKTAKOM ATE-6006 combines photo tachometer and exactly with no contact tachometer.
Features
- Worlds patent, Multi-functions, one instrument combine Photo Tach. (RPM) and exactly with no Contact Tach. (RPM, m/min., ft/min)
- Laser light source, long detecting distance
- Wide measuring range from 0.5 to 100,000RPM
- 0.1RPM resolution for the measured value <1000RPM
- High precision with 0.05% accuracy
- The last value, max. value, min. value will be stored into the memory automatically and can be obtained by pressing Memory Call Button
- High visible LCD display gives RPM reading exactly with no guessing or errors and saves battery energy
- This tachometer used the exclusive one chip MICRO-COMPUTER LSI circuit & crystal time base, offer the high accurate measurement and fast sampling time
- The use of durable, long lasting components, including a strong, light weight ABS plastic housing, assures almost maintenance free performance for many years
- The housing cabinet has been carefully shaped to fit comfortable in either hand
Specifications
Measurement and Range:
Photo tachometer: 0.5 to 19,999RPM
Contact tachometer: 0.5 to 19,999RPM
Surface speed:
- m/min. 0.05 to 1,999.9m/min.;
- ft/min. 0.2 to 6,560ft/min
Resolution:
RPM:
- 0.1RPM (<1,000RPM)
- 1RPM (1,000RPM)
m/min:
- 0.01m/min (<100m/min)
- 0.1m/min. (100m/min)
ft/min:
- 0.1ft/min (<1,000ft/min)
- 1ft/min (1,000ft/min)
Display: 5 digits, 10mm (0.4") LCD
Accuracy: ±(0.05%+1digit), RPM only
Detecting distance: 2in to 78.7in / 5cm to 200cm typical
The specification detecting distance (max. 78.7in/200cm) are tested under the 1800RPM & the size of the reflecting tape is 0.4x0.4in/1x1cm
Light Source: 1mW class 2 laser diode
Time base: Quartz crystal
Circuit: Exclusive one-chip of microcomputer LSI circuit
Operating temperature: 0-50°C (32-122°F)
Operating humidity: Less than 80% R.H.
Memory: Last/Max./Min. value.
Battery 4x1.5V AA (UM-3) batteries
Power Consumption:
- Photo type: Approx. DC 21mA
- Contact type: Approx. DC 7mA
Dimensions: 8.5x2.6x1.5in/215x67x38mm
Weight: 0.61lb/280g, including batteries
Accessories
- Carrying case
- Reflecting tape marks
- RPM adapter (CONE)
- RPM adapter (FUNEL)
- Surface speed test wheel
- Operation manual
| ATE-6006 Laser Photo/Contact Tachometer - side view |
|
|
| ATE-6006 Laser Photo/Contact Tachometer - rear view |
|
|
| ATE-6006 Laser Photo/Contact Tachometer - case |
|
|
|
Photo tachometer measuring procedure
- Select the "Function Switch" (3-8, Fig. 1) to the "Photo RPM" position.
- Apply a reflecting mark to the object being measured. Depress the "Measuring Button" (3-6, Fig. 1) & align the "Laser light beam" (3-2, Fig. 1) with the applied target. Verify that the "Monitor Indicator" (3-4, Fig. 1) lights when the target pass through the light beam. Release the "Measuring Button" when the reading stabilizes (about 2 seconds).
Note: If the measured RPM values is very low (for example less than 50RPM), recommend to attach more "Reflecting Marks" average to the object. It will get the real RPM with high resolution, precisely & fast sampling time when divided the reading values by the no. of the "Marks".
CAUTION: LASER RADIATION – DO NOT STARE INTO LASER BEAM
Class II laser products.
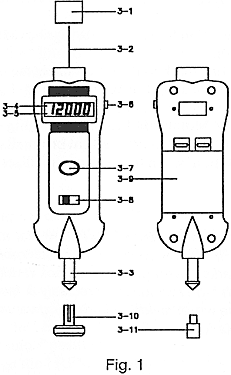 | 3-1 Reflecting Mark
3-2 Laser Light Beam
3-3 RPM Adapter
3-4 Monitor indicator
3-5 Display
3-6 Measuring Button
3-7 Memory Call Button
3-8 Function Switch
3-9 Battery Compartment
3-10 Surface Speed Test Wheel
3-11 Funnel type rubber for RPM adapter |
Contact tachometer measuring procedure
RPM measurement
- Select the "Function Switch" (3-8, Fig. 1) to the "Contact RPM" position.
- Depress the "Measuring Button" (3-6, Fig. 1) & lightly pressing the "RPM Adapter" (3-3, Fig. 1) against the center hole on the hole of the measured rotating axis. Release the "Measuring Button" when the reading stabilizes (approx. 2 sec.).
Note: Making the contact RPM measurement due to different kind measured rotating axis, it may changed the rubber tor RPM adapter from "CONE" type to "FUNNEL" type (3-11, Fig. 1).
Surface Speed Measurement
- Select the "Function Switch" (3-8, Fig. 1) to the "m/min." or "ft/min." position.
- Change the "RPM Adapter" instead of the "Surface Speed Test Wheel" (3-11, Fig. 1)
- Depress the "Measuring Button" (3-6, Fig. 1) & simply attaching the surface speed test wheel to the detector. Release the "Measuring Button" when the reading stabilizes (approx. 2 sec.).
Back to the section
|
|

