|
|
ATE-2509 Infrared Thermometer
ATE-2509 Infrared Thermometer
|
|
IR Measurement Range: -60 to 1000°C (-76 to 1832°F). IR Accuracy: ± 1°C (1.8°F): Object Temp. = 15 to 35°C, Ambient Temp. = 25°C; ± 2% of reading or ±2°C ( ±4°F) whichever is greater. Object Temp. = -33 to 1000°C. Ambient Temp. = 23±3°C. Type K Thermometer range: -64 to 1400°C (-83.2 to 1999°F). Type K Thermometer accuracy: ±1% of reading or ±1°C (±1.8°F), Test under T ambient = 23±5°C. Resolution: 0.1°C/0.1°F. <1,000°C/<1,000°F; 1°C/1°F. ≥1,000°C /≥1,000°F. Measurement Wavelength Region: 8 to 14μm. Sampling Time: Approx. 0.7 second. Operating Temperature: 32 to 122°F/0 to 50°C. Operating Humidity: Less than 80%RH.
Manuals:
|
|
AKTAKOM ATE-2509 provides none contact infrared temperature measurement.
Features
- None contact infrared temperature measurement up to 1832°F/1000°C measurement
- Type K thermocouple thermometer, up to 2552°F/1400°C measurement
- Dual laser for better targeting
- Large LCD display with back light
- D/S ratio value: 50/1
- Min., Max., Differential, Average, Lock mode
- Last measurement memory
- Hi/Lo Temperature Audio Alarm
- Laser target and Back light On/Off control
- Adjustable emissivity value from 0.1 to 1.00
- Preset emissivity value at 0.95
- Power supply by two AAA batteries, long life
Specifications
General specification:
Display: LCD, 1.2x1.7in/31x43mm
Functions:
- °C, °F
- Min., Max., Differential, Average
- Lock mode
- Auto power off
- LCD back light
- Emissivity adjustment
IR Measurement Range: -60 to 1000°C (-76 to 1832°F)
IR Accuracy:
- ±1°C (1.8°F): Object Temp. = 15 to 35°C / 59 to 95°F, Ambient Temp. = 25°C/77°F
- ±2% of reading or ±2°C (±4°F) whichever is greater. Object Temp. = -33 to 1000°C / -28 to 1832°F, Ambient Temp. = 23±3°C
Type K Thermometer range: -64 to 1400°C (-83.2 to 1999°F)
Type K Thermometer accuracy: ±1% of reading or ±1°C (±1.8°F), Test under T ambient = 23±5°C
Resolution:
- 0.1°C/0.1°F. <1,000°C/< 1,000°F
- 1 °C /1 °F. ≥1,000°C/≥ 1,000°F
Circuit: Exclusive microcomputer circuit
Emissivity Adjustment: Adjustment range: 0.10 to 1.00, step 0.01
0.95 default emissivity value
IR Temp. Sensor: Thermocouple pie
Measurement Wavelength Region: 8 to 14 micro meter
Distance Facto: D/S : Approx. 50:1 (typical 25:1); D - Distance, S – Spot
Distance to spot using 90% encircled energy at focal point
Target Guide:
- Two laser target guide
- Less than 1mW
- Class 2 red laser diode. Wave length is 645nm approximately
Sampling Time: Approx. 0.7 second
Power Supply: DC 1.5V AAA (UM-4) battery x 2 PCs, heavy duty or Alkaline
Power Consumption:
- without target light on: Approx. DC 1.5mA
- with target light on: Approx. DC 29.5mA
Operating Temperature: 32 to 122°F / 0 to 50°C
Operating Humidity: Less than 80%RH.
Weight: 0.85lb/386g
Dimensions: 8.0x7.7x1.8in/203x197x47mm
Standard accessories
- Operational manual
- Hard carrying case
- DC 1.5V AAA (UM-4) battery x 2 PC
| ATE-2509 Infrared Thermometer - accessories |
|
|
| ATE-2509 Infrared Thermometer - case |
|
|
| ATE-2509 Infrared Thermometer |
|
|
|
Measuring procedures
 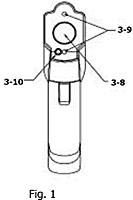 | 3-1 Emissivity Button
3-2 Down Button
3-3 LCD Display
3-4 Up Button
3-5 Mode Button
3-6 Measure Switch
3-7 Battery Cover
3-8 Infrared Lens
3-9 Laser
3-10 LED
3-11 Thermocouple Socket |
- Default LCD Screen

- Simply aim the thermometer at the measure target with "Infrared Lens" (3-8, Fig. 1) and press "Measure Button" (3-6, Fig. 1) to display the surface temperature. The Distance: Spot is 50:1. The two laser points are the reference for the target spot size. Please make sure the target area is within the field of view.
- Press "Emissivity Button" (3-1, Fig. 1) for setting the emissivity.

Press "Emissivity Button" (3-1, Fig. 1), then press "Up Button" (3-4, Fig. 1) or Down key (3-2, Fig. 1) to set the emissivity, then press "Mode Button" (3-5, Fig. 1) to confirm it. The emissivity can be changed from 0.10 to 1.
- Press "Mode Button" (3-5, Fig. 1) for scrolling more display function as follows.
 | Here will show the emissivity data. (The default emissivity is 0.95.) |
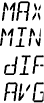 | Press Mode key (3-5, Fig. 1) for the Maximum (MAX), Minimum (MIN), Different between MAX and MIN (DIF) and Average (AVG) modes. During the measurement, the special modes reading will be displayed beside the mode icon |
 | Press "Up Button" (3-4, Fig. 1) or "Down Button" (3-2, Fig. 1) key to change the High Alarm (HAL) or Lo Alarm (LAL), then press "Measure Button " (3-6, Fig. 1) to confirm it.
For example: When the reading 26.9 °C < LAL 27 °C, the Low icon will flash and you will hear a beep sound. |
 | Connect the thermocouple with "Thermocouple Socket" (3-11, Fig. 1) and put the probe in/on the target, the thermometer will display the temperature automatically without pressing any button. To see the minimum or maximum data during the probe measurement, please hold down the "Up Button" (3-4, Fig. 1) or "Down Button" (3-2, Fig. 1).
!!! After measure high temp, the probe may remain HOT for a while |
- The thermometer will automatically shut off if left idle for more than 60 seconds.
- In MAX, MIN, DIF, AVG mode:
a. Press "Up Button" (3-4, Fig. 1) for LOCK mode ON/OFF. The lock mode is particularly useful for continuous monitoring of temperatures for up to 60 minutes.
b. Press "Down Button" (3-2, Fig. 1) for °C or °F transferred.
- In all modes: First hold on the "Measure Button" (3-6, Fig. 1)
a. and press "Up Button" (3-4, Fig. 1) for backlight function ON/OFF.
b. and press "Down Button" (3-2, Fig. 1) for laser function ON/OFF. (With flash light be turned on in the same time as laser)
Back to the section
|
|


