|
|
ASE-1117 Soldering Station
ASE-1117 Soldering Station
|
|
Soldering station. Input voltage: 110/220V AC, Power consumption: 60W, Temperature-controlling range: 302-842°F (150-450°C), Ground impedance <2Ω, Ground Voltage <5mV. Weight: 2.7kg/5.9lb
Manuals:
|
|
Temperature-controlled digital soldering station AKTAKOM ASE-1117 is used for soldering portable electronic appliances, modeling and development, as well as assemblage in small enterprises. Antistatic design, soldering iron with ceramic heater. 60W power. Iron holder and cleaning sponge included in package.
Features
- ESD safe – suitable for work on static-sensitive components
- Three programmable preset temperature buttons
- Easy to read white-on-blue LCD with temperature in °C or °F
- Temperature range: 150 to 450°C (302 to 842°F)
- On/Off switch on side of unit
- Includes soldering iron, stand, and sponge
- Additional range of soldering tips available
- New appearance design, big LCD screen, for clear and convenient reading
- PID power control loop with constant temperature set by MCU computer for more precision temperature control
- Imported temperature-beard materials with long life
- It is convenient that the device adopt three programmable knobs in different condition
- Display the temperature between Fahrenheit and Celsius flexibly, convenient for the type of operators
- Computerized temperature calibration can correct the difference between the actual and display temperature quickly
- Heating element malfunction alert
Technical Specifications
- Input voltage: 110/220VAC
- Power consumption: 60W
- Temperature-controlling range: 302-842°F (150-450°C)
- Output voltage: 28 VAC
- Ground impedance: <2Ω
- Ground Voltage: <5mV
- Temperature stability: ±1°C (static)
- LCD digital display
- Calibrating method: Digital calibration
- Temperature range for calibration: 50°C~-50°C (122°F~-58°F)
- Max surrounding temperature: 40°C
- Heating element: 2 cores
Warning
Temperature of iron tip will be up to 392-752°F (200–400ºC) after connecting power, so it may lead to injury or fire because of improper usage. Please abide the following terms:
- Don't touch the iron tip or surrounding metals.
- Never operate it near the flammable gas or substance.
- Disconnect from power source if the unit will not be used for long periods. Switch off power during short breaks.
- Replace accessories or iron tip after turning off the station and let it cool down.
- Never operate this device, if you don't have soldering experience or enough knowledge to use.
- Keep away from children.
Accessories
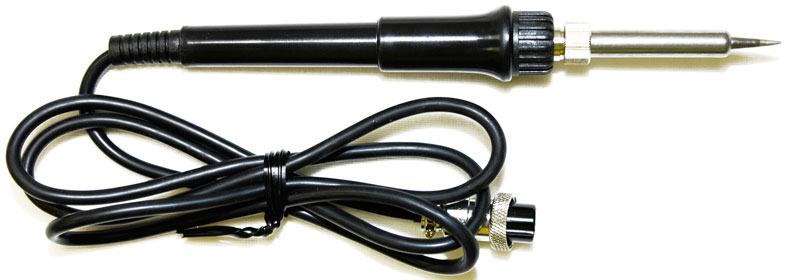
Soldering iron
Iron holder
Power cord
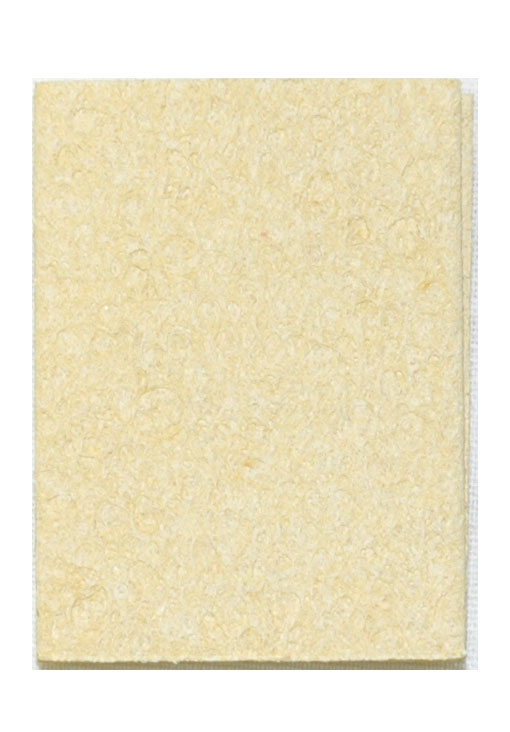
Cleaning sponge
User manual
| ASE-1117 Soldering Station - rear view |
|
|
| ASE-1117 Soldering Station - side view |
|
|
| ASE-1117 Soldering Station - Soldering iron |
|
|
|
| ASE-1117 Soldering Station - Soldering iron holder |
|
|
Safety instructions
Take care of yourself!
- Please read user manual carefully before using the instrument.
- Do not use the device if there is visible damage.
- Repair and maintenance of the device can be done only by a qualified specialist of the service center.
- Before connecting the instrument to the electrical network, observe all known precautions, and make sure that the grounding system is to avoid electric shock.
- Use only those accessories that are intended for use with this device.
- While working, do not touch the metal parts near the tip of the soldering iron.
- After completion of the work, it is necessary to install the soldering gun in the regular holder of the soldering gun.
Operation Instruction
- Connection: Insert soldering iron's plug into the socket and tighten the nut on the plug securely and place it in iron holder. Inset station's power cord into power plug on the back panel and plug the cord into a power source.
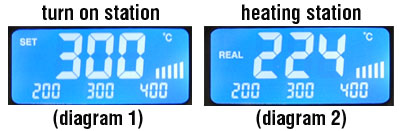
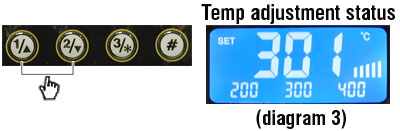
- Power on: Turn on the unit. The Digital display will initially display the current set temperature (the value of last time using for 3 seconds. After few seconds it would display the actual temperature with temp unit “°C or °F” (diagram 1), (diagram 2).
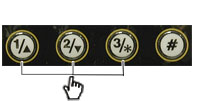
- Adjusting Temperature: Under normal working condition, pressing and holding button you can either increase or decrease the temperature quickly. Keeping the knob in pressed will adjust the temperature setting quickly; short pressing knob, you can adjust temp step by step. The display screen shows the temperature value simultaneously. Release knob for 3s to store (diagram 3).
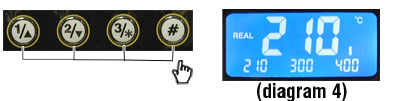
- Quickly adjusting temperature: Under working condition, you can set working temperature quickly by programmable buttons. Press the button once to extract setting temperature stored in button “1, 2 & 3”, this way you can easily set the working temperature.
Pressing button “#” and buttons “1, 2, 3”, you can store the setting temperature into fast channel knobs “1, 2, 3” (diagram 4).
Temperature hotkey:
A. Hotkey 1 is usually applied to store a 392°F/200°C or lower temperature value at which level machine stands by and on rest.
B. Hotkey 2 is a shortcut of temperature between 572°F/300°C to 662°F/350°C at which level a general soldering job can be done.
C. Hotkey 3 is a fast channel to high temperature of 716°F/380°C specificied for special welding job.
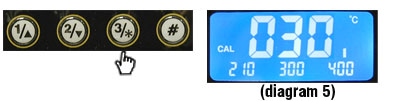
- Temperature calibration: You need calibrate the temperature of tip after you replace with a new heating element or tip. Enter into calibrating station by long pressing knob “
 ” (>3s). You can directly adjust the value of calibration by pressing knob "↑" or "↓". The value of calibration is temperature measured minus the settings. (e.g. Actual value 380°C – setting value 662°F / 350°C = +86°F / +30°C. Pressing knob "↑" adds +86°F / +30°C; Actual value 608°F / 320°C– setting value 662°F / 350°C = -86°F / -30°C. Pressing knob "↓" minus 86°F / 30°C). The calibrating temp range is 122°F / +50°C ~ 122°F / -50°C. You can press knob “” to store after you finish calibration (diagram 5). ” (>3s). You can directly adjust the value of calibration by pressing knob "↑" or "↓". The value of calibration is temperature measured minus the settings. (e.g. Actual value 380°C – setting value 662°F / 350°C = +86°F / +30°C. Pressing knob "↑" adds +86°F / +30°C; Actual value 608°F / 320°C– setting value 662°F / 350°C = -86°F / -30°C. Pressing knob "↓" minus 86°F / 30°C). The calibrating temp range is 122°F / +50°C ~ 122°F / -50°C. You can press knob “” to store after you finish calibration (diagram 5).
- Temperature unit exchange: In the power off condition, press and hold knob “#”, then turn on the station, the temp unit will be changed between “°C” and “°F” and store automatically.
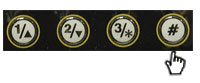
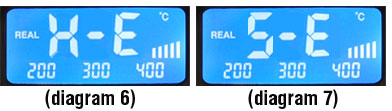
- False alarm: When “H-E” or “S-E” is displayed on the screen, there is some wrong in heating element or the circuit. (diagram 6, 7). Turn off the unit and follow the instructions to replace the heating element.
Safety Precautions
Caution! Improper usage can cause serious injury to personnel and/or damage to equipment. For personnel safety, please follow these precautions:
- Never use it to do other work except soldering.
- Do not subject the main unit to physical shock. Never drop or sharply jolt the unit.
- Don't change the device at will.
- Replace loss items with original accessories.
- Don't put it in water or operate with wet hands.
- Don't pull the cable but hold tightly the plug when you take it out of plug.
- Please keep the operate place well ventilated since soldering process produce smoke.
- Don't play with other people or would be easy to hurt others or yourself.
Care and Maintenance
- Keep the soldering station dry; if it gets wet, dry it immediately.
- Use the soldering station only in normal temperature environments.
- Keep the soldering station away from dust and dirt.
- The soldering iron tip should be cleaned after use by wiping it on the damp sponge found in the soldering iron stand. This is to get rid of burnt solder or fluxes that cause oxidation on the tip.
Frequently Asked Questions
How to change a soldering tip?
How to care and use of the soldering tip?
How to clean the tip?
What temperature should use for soldering?
Why a "de-tinned" tip fails to work?
| How to change a soldering tip? |
- Always turn the power «OFF» when removing or inserting a tip.
- Let the tip to cool down to room temperature before holding it with heat resistant pads.
- Unscrew the mental cap nut.
- Pull out the shaft of the soldering iron.
- Replace it with a new soldering tip.
- Put back the shaft and securely lock with the metal cap nut.
Up
|
| How to care and use of the soldering tip? |
|
High soldering temperatures can degrade the tip. Use the lowest possible soldering temperature. The excellent thermal recovery characteristics ensure efficient and effective soldering event at low temperatures. This also protects the sensitive components from thermal damage. Clean the tip regularly with a cleaning sponge, as oxides and carbides from the solder and flux can form impurities on the tip. These impurities can result in defective joints or reduce the tip's heat conductivity. When using the soldering iron continuously, be sure to loosen the tip and remove all oxides least once a week. This helps to prevent reduction of the tip temperature. Never leave the soldering iron sitting at high temperature for long periods of time, as the tip's solder plating will be covered with oxide, which can greatly reduce the tip's heat conductivity. Wipe the tip and coat it with fresh solder after use. This helps to prevent tip oxidation.
Up
|
| How to clean the tip? |
|
Caution! Never file the tip to remove oxide.
- Set the temperature to 250°C.
- When the temperature stabilizes, clean the tip with the cleaning sponge and check the condition of the tip.
- If there is black oxide on the solder-plated portion of the tip, apply new solder (containing flux) and wipe the tip on the cleaning sponge. Repeat until the oxide is completely removed. Coat with new solder. The solder protects the tip from oxidation and prolongs the life of the tip.
- If the tip is deformed or heavily eroded, replace it with a new one.
Up
|
| What temperature should use for soldering? |
600°- 650°F (316°- 343°C) is a good place to start for lead-based solder and 650°- 700°F (343°- 371°C) for lead-free solder.
Note: if clots form, the temperature is too low.
Up
|
| Why a "de-tinned" tip fails to work? |
|
A de-tinned tip is one which cannot wet with solder. This exposes the plating to oxidation and degrades the heat transfer efficiency of the tip.
The de-tinning is caused by:
1) Failure to keep the tip covered with fresh solder while not in use.
2) High tip temperatures.
3) Insufficient melting in soldering operations.
4) Wiping the tip on dirty or dry sponges and rags (Always use a clean, wet, industrial grade, sulfur-free sponge).
5) Impurities in the solder, iron plating, or on the surfaces to be soldered.
Up
|
Back to the section
|
|


