|
|
AM-1171 Digital Multimeter
AM-1171 Digital Multimeter
|
|
Digital push-button control multimeter, 3 5/6 digit LCD (5999), bar graph indication and frequency measurement path with a graphic scale (61 segment), the basic error of 0.5%. Measurement of DC voltage of 1000V ± (0.5%+4); AC voltage of 750V ± (0.8%+10); DC of 10A ± (1.0%+10); AC of 10A ± (1.5%+10), resistance of 60MΩ ± (0.8% +4); capacity up to 200µF ± (3.5% +8); frequency of 30MHz ± (0.1%+10); duty cycle 0.1%…99.9%; temperature (K-type thermocouple) -20...1000°C ± (1.0%+5°C). Frequency range of 40...400Hz. Continuity test, diode test, auto power off, protection against overload, misconnection and electric shock, USB interface, discharge indicator, 2 fuses, relative measurements, backlight; MIN / MAX; backlight. Power: 2x1.5V. Dimensions: 200x90x45mm / 7.9x3.5x1.8in, weight: 320g / 11.3oz.
Manuals:
|
|
AKTAKOM AM-1171 multimeter is designed to measure DC and AC, DC and AC voltage, resistance, capacitance, frequency, diode control and continuity test. AM-1171 model can be also used for temperature measurement and can be connected to a PC via USB interface.
Specifications
- Display type: LCD
- Maximum display: 5999.3 5/6 display automatic polarity display and unit display.
- Bar graph indication and frequency measurement path, 30 times/sec (61 analog bars)
- Measurement mode: dual integration A/D conversion.
- Sampling rate: About 3 time/s.
- Auto Power Off: can be disabled
- Over range: Display "OL"
- Low voltage display: about 2.4V, the symbol displayed.
- Working temperature: 0…40°C
- Storage temperature: -10…50°C, relative humidity <80%
- Power: Two 1.5V batteries ("AAA" 7# batteries)
- Volume (Dimensions): 185×91×49mm(Length*width*height)
- Weight: About 410g (including battery)
Accessories
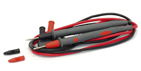
1. Red and Black Test Leads
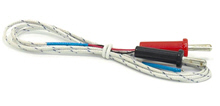
2. Thermocouple (K type)
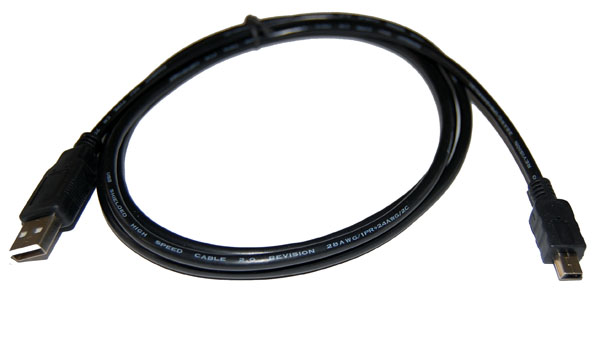
3. USB-cable
4. Software

5. Battery: 1.5V AAA x 2

6. Instruction Manual
| AM-1171 Digital Multimeter - front view |
|
|
| AM-1171 Digital Multimeter - with USB cable |
|
|
| AM-1171 Digital Multimeter - accessories |
|
|
|
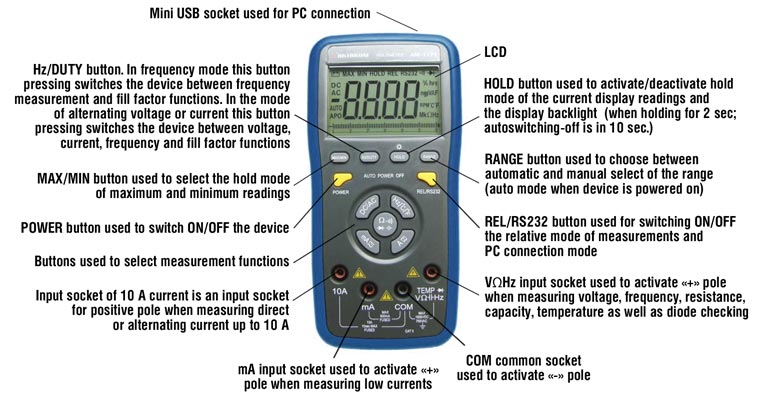
Controls of AM-1171 multimeter
AC Current Measurement
- Press the "
 " button or " " button or " " button. Plug the black meter pen into the terminal of "COM" and the red meter pen to the terminal of "mA" or "10A". " button. Plug the black meter pen into the terminal of "COM" and the red meter pen to the terminal of "mA" or "10A".
- Circularly press the "" button or "" button. Select automatic AC 600mA and 10A current to test. The "AC", "AUTO", "APO" symbols will appear on the LCD screen.
- In case "OL" is displayed on the display, it indicates the current being measured has exceed the current range, and please select higher ranges for measurements.
Caution:
- At the 10A mode, current bigger than 10A cannot be measured, and at mA mode, the current bigger than 600mA cannot be measured. Otherwise this will lead to the burning of the fuse or damage the instrument.
- When the meter pen is plugged in the input terminal of the current, it is strictly prohibited to have the meter pen connected in parallel on any circuits.
DC Current Measurement
- Press the "" button or "" button. Plug the black meter pen into the terminal of "COM" and the red meter pen to the terminal of "mA" or "10A".
- Circularly press the "" button or "" button. Select automatic DC 600mA and 10A current to test. The "DC", "AUTO", "APO" symbols will appear on the LCD screen.
- In case "OL" is displayed on the display, it indicates the current being measured has exceed the current range, and please select higher ranges for measurements.
Caution:
- At the 10A mode, current bigger than 10A cannot be measured, and at mA mode, the current bigger than 600mA cannot be measured. Otherwise this will lead to the burning of the fuse or damage the instrument.
- When the meter pen is plugged in the input terminal of the current, it is strictly prohibited to have the meter pen connected in parallel on any circuits.
 
AC Voltage Measurement
- Circularly press the "AC/DC" key until it selects the AC Voltage automatic measurement mode. Meanwhile, the symbol "AC","AUTO","APO" will appear on the LCD. Respectively plug in the red and black meter pens into the terminals of "
 " and "com". " and "com".
- The initial state of the meter is automatic range, which shows "AUTO" symbol. Press the "Range" key and switch it to manual range mode. In the AC mode of automatic/manual range, the frequency/ duty cycle can be measured by pressing "Hz/DUTY". However, the frequency response now is low, which is suitable for the measurement of high voltage and low frequency in the environment of magnetic field interference such as 220V/50Hz…400Hz, 380V/50Hz…400Hz.
Caution: Voltages over DC 1000V or AC 750V cannot be tested. In case "OL" is displayed for manual range mode, it indicated the range has been exceeded and it is necessary to select higher range mode to complete this measurement.

DC Voltage Measurement
- Press "AC/DC", select automatic measurement of DC voltge., and respectively plug in the red and black meter pens into the terminals of "VΩHz" and "COM", as shown in the following diagram.
- The initial state of the meter is the DC voltage automatic measurement mode, which shows the symbols of "DC" "AUTO" "APO". Press "RANGE" is to select manual range mode; Press "MAX/MIN" once to show the Max measurement value. Press "MAX/MIN" again to show the Min measurement value. Press "MAX/MIN" over 2 seconds is to cancel the measurement of the MAX/MIN value.
- Touch the measuring point with the meter measuring pen and connect it in parallel to the circuit being tested, and the polarity of the red meter pen wire and the tested voltage value are spontaneously displayed on the display.
Caution:
- Voltages over DC 1000V or AC 750V cannot be tested.
- When measuring high voltages, special precautions must be taken to avoid electrical shock.When measurement is completed, immediately disconnect the meter pen and the measured circuit.
- In case "OL" is displayed for manual range mode, it indicated the range has been exceeded and it is necessary to select higher range mode to complete this measurement.

Capacitance Measurement
- Press "Ω
   " button, and respectively plug the red and black meter pens into the holes of "" and "COM". " button, and respectively plug the red and black meter pens into the holes of "" and "COM".
- Circularly press "Ω" button and select the automatic measurement range of capacity. Meanwhile, the corresponding
symbol will appear on the LCD screen. No manual measurement range and analog bar will be displayed in Capacity mode.
Caution:
- When measuring the capacity, all the powers within the tested circuits must be disconnected and the capacitance shall be sufficiently discharged
- When measuring big capacitors, it takes a longer time, about 100μF per 15 seconds.
- When the measurement is completed, immediately disconnect the meter and the measured circuit.

Diode and On-and-Off Test
- Press "Ω" button, and respectively plug the red and black meter pens into the holes of "" and "COM".
- Circularly press "Ω" button to select the diode or buzzer measurement. In Diode mode, LDC screen displays "
 " and voltage symbol, and the buzzer symbol " " and voltage symbol, and the buzzer symbol " " is also displayed on the screen. " is also displayed on the screen.
- Connect the red meter pen to the positive of the diode, the black meter pen to the negative of the diode.
Caution:
- In case the diode is open circuit or the polarities are connected reversely, "OL" will be displayed on the screen.
- When checking the diode, all the powers within the tested circuits must be disconnected and the capacitance shall be sufficiently discharged.
- When the measurement is completed, immediately disconnect the meter and the measured circuit.
Frequently Asked Questions
Does AKTAKOM AM-1171 multimeter have auto power off function?
How can I deactivate Auto Power Off function of AKTAKOM AM-1171 multimeter?
How can I measure temperature with Aktakom AM-1171 multimeter?
How can I measure frequency with Aktakom AM-1171 multimeter?
How can I measure resistance with Aktakom AM-1171 multimeter?
| Does AKTAKOM AM-1171 multimeter have auto power off function? |
|
Yes, it does. There is Auto Power Off function in AM-1171: the device power automatically goes off if you do not use the device within 10 minutes. 1 minute before the multimeter powers off it will make 3 sound signals and before the powering-off – several more signals. If you’d like to switch the device on after it was automatically powered off press any of SELECT, RANGE, MAX/MIN, HOLD or POWER keys.
Up
|
| How can I deactivate Auto Power Off function of AKTAKOM AM-1171 multimeter? |
|
To deactivate Auto Power Off function keep REL 2 button pressed for 2 seconds (“APO” indication will disappear from the display).
Up
|
| How can I measure temperature with Aktakom AM-1171 multimeter? |
- Press “Hz/°C/°F” button for over 2 seconds, select temperature mode for Celsius measurement. Meanwhile, the temperature symbol will be displayed. Further press "Hz/°C/°F", it will be displayed in Fahrenheit. The procedure repeats in the same order. To exit the temperature measurement mode press "Hz/°C/°F" button for over 2 seconds again .
- Connect the test leads to "VΩHz" and "COM" accordingly.
- Put the thermocouple-sensing element on the surface of the object under test. See the readings on the display.
- Without the thermocouple Aktakom AM-1171 multimeter displays the temperature of the inner contacts.
Note: Do not input voltage in the temperature measurement mode.
Up
|
| How can I measure frequency with Aktakom AM-1171 multimeter? |
- Press Hz/°C/°F – Aktakom AM-1171 multimeter will enter into the frequency measurement mode.
- Connect the test leads to "VΩHz" and "COM" accordingly.
- Connect the test leads in parallel to the source of the signal under measurement and see the readings on the display.
In the AC voltage measurement mode the switching between frequency measurement functions and duty factor is made with Hz/DUTY button. When measuring frequency the analog scale is not displayed.
Note: after the measurement process is completed you need to disconnect the device from the circuit under test immediately.
Up
|
| How can I measure resistance with Aktakom AM-1171 multimeter? |
|
Note:
- When measuring capacity and taking diode test the power supply should be disconnected from the circuit under test, and all of the capacitors in it should be discharged. The measurement of large capacity may take a long time.
- If in the capacity measurement mode you mistakenly input voltage to the device it will make automatic protection system work that will save Aktakom AM-1171 from damage.
- Any voltage in the circuit when measuring resistance may cause inaccurate measurement. If such voltage exceeds 250 V it may cause the device damage.
- At 600 Ohm range you should at first measure the wire resistance and after that, using the received value, correct the sequent measurement.
- If there is open circuit connected to AM-1171 or inversed polarity diode you will see “OL” symbol on the display.
- After the measurement process is completed you need to disconnect the device from the circuit under test immediately.
- Press
 button which helps to switch the measurement modes specified above. button which helps to switch the measurement modes specified above.
- Connect the red and black test leads to «VΩHz» and «COM» accordingly.
- When measuring resistance, capacity and making continuity test you need to connect the test leads to the outputs of the circuit or element under measurement. When making the diode test you need to connect the red test lead tip to the positive diode output and the black one – to the negative output.
Note: In these modes RANGE, MAX/MIN, HOLD buttons are active.
Up
|
Back to the section
|
|


