|
|
ASE-4508 SMD Rework Station
ASE-4508 SMD Rework Station
|
|
Multifunctional hot air SMD rework station. Input Voltage: 110VAC, Power Consumption: 700W, Type of air pump: Gentle wind of brushless fan, Temperature range: 212-842°F / 100-450°C, Noise:< 45dB, Air volume: 120l/min (max). Weight: about 1.5kg/3.3lb
Manuals:
|
|
AKTAKOM ASE-4508 multifunctional hot air rework station allows easy mounting and removal of SMD components including QFP, SQL and BGA.
Characteristics
- Closed-loop sensors; Zero-crossing triggering temperature control of microcomputer; LED display; high power; rapid rise of temperature; temperature high and stable; not affected by the amount of air to achieve the goal of unsoldering without lead.
- The amount of air flow can be modulated; large and soft air flow; it is convenient to modulate temperature; it is suitable for many purposes.
- There is a conductive switch on the handle; only if you hold the handle, the system can enter the working mode rapidly; while the handle is put on the shelf, it will enter the waiting state; easy to operate.
- There is no automatic cooling function, which can extend the lifespan of the heating element and protect the hot air rework station.
- Plastic shell; cabinet; good-looking; it occupies little space.
- It adopts the brushless fan, which has a long life span and little noise.
- Blowing plastic components won't be deformed. Such as buzzer and external interface of mobile phone.
- Blowing shielding box will not make it discolor.
- Blowing PCB will not make it blister
- Safely remove BAG-IC, keep pins intact. Much more safe and reliable.
Technical Parameters
- Input Voltage: 110VAC
- Power Consumption: 700W
- Type of air pump: Gentle wind of brushless fan
- Gas flow: 120l/min (max)
- Type of air pump: Gentle wind of brushless fan
- Temperature range: 212-842°F / 100-450°C
- Noise :<45dB
- Display: LED
- Length of handle (including the wire): 1.2cm
- Size: 5,9x3,9x6in / 151x100x153mm
- Weight: 3.3in / 1.5kg
Warning
- Before using the hot air rework station, you must abide by the following measures in order not to get an electric shock, result in damages to people or result in fire, etc.
- In order to secure the safety of people, you must use the parts or accessories that the factory of origin certificates or recommends; or it will lead to serious aftermaths.
- This rework station must be repaired by qualified technicians or the appointed person by us.
- Be careful, for it is operated at a high temperature. Don't use it near flammable and explosive gas and objects, for the tip and the air from it are steaming-hot, which can burn people. Don't touch the heating element or spray the hot air against people.
- When the hot air rework station starts to work, don't leave from your post.
- Keep away from children.
- When it starts to work, don't install the nozzle until the heating pipe and nozzle are cooled.
- Please keep the draughts of input and output expedite; there should be no block.
- After using it, remember to cool the machine. You should put the handle on the shelf. When the machine is in the waiting state, you can make the power off.
- If you don't use it for a long time, you should put the connector plug off.
Accessories
- Iron holder
- Hot air gun nozzles
- Power cord
- User manual
| ASE-4508 SMD Rework Station - front view |
|
|
| ASE-4508 SMD Rework Station - with accessories |
|
|
| ASE-4508 SMD Rework Station - side view |
|
|
|
| ASE-4508 SMD Rework Station - hot air gun with nozzle |
|
|
Safety instructions
Take care of yourself!
- Please read user manual carefully before using the instrument.
- Do not use the device if there is visible damage.
- Repair and maintenance of the device can be done only by a qualified specialist of the service center.
- Before connecting the instrument to the electrical network, observe all known precautions, and make sure that the grounding system is to avoid electric shock.
- Use only those accessories that are intended for use with this device.
- While working, do not touch the metal parts near the tip of the soldering iron.
- After completion of the work, it is necessary to install the soldering gun in the regular holder of the soldering gun.
Operation instruction
Installation
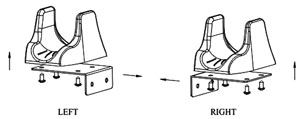
When the new machine is operatedfor the first time, you must install the handle shelf; the picture is as follows.
- According to personal habits, you can screw the four screws tightly.
- According to your need, remove the two screws of the fixed handle shelf on the right or on the left.
- Put the two installation holes of the handle shelf in the fixed screw holes, and then screw the two removed screws tightly.
- Put the components of the handleon the handle shelf and check if it is suitable.
Operation
- Place the rework station, and put the handle on the handle shelf.
- Connect the power cord, fix the nozzle which you need. (Set the air capacity max.)
- Switch the power on, set the temperature which you need.
- Hold the handle, the unit will heat normally. The unit will operate normally after the temperature is stable.
- After operating you must put the handle on the handle shelf, now the unit will stop heating automatically, and be on stand by state.
- Disconnect the power if you don't use the unit for a long time.
 CAUTION! CAUTION!
If you can finish your work at a lower temperature and larger airflow, this can make the life span of the heating elements longer and make the IC chip safer.
Temperature Setting
Hot Air Rework Station of LED-based Instruction
Rotate temperature control knob to the desired location of the temperature scale line.
Hot Air Rework Station of LED Microcomputer Digital Display
- When connecting the power, press the connected keys; then the setted temperature will appear on the temperature display window.
- Press the key that is upward; then the setted temperature will rise by 1, which will appear on the display window. Press the key that is downward; then the setted temperature will fall by If the two keys are pressed successively, the temperature will rise or fall rapidly. If you release the pressed keys, the setted temperature will appear for two seconds on the display window and then the actual temperature will appear.
Note: Symbol Description
- Display “SLP”, means the outlet temperature is lower than 100 and the rework station enters the waiting mode. The handle should be put on the handle shelf.
- Display S-E, means there is something wrong with the sensor of the rework station. The heating elements should be changed. (heating elements and components of the sensor)
- When operating, the display temperature H-E, means that the temperature will not rise and the heating elements of the rework station may be damaged; the heating elements should be changed. (heating elements and components of the sensor)
Operation Instructions
- There may be very high temperature in the outlet or near it. Be careful in order not to get hurt.
- The heating handle must be put on the handle shelf. Don't put it on the table or other places.
- Keep the blowing way unblocked.
- After using, make sure the unit cool down, put it in a safe place. After turn the power off, the unit will automatically blow cool air for a short time. Don't disconnect the plug during this cooling process, it will power off automatically about one minute later.
- When operating, the distance between the outlet and the object should be at least 2mm on the basis of the outlet.
- According to the requirements of work, choose the suitable nozzle, for different nozzles are a little different in temperature
Replacement Of The Heating Element
- Replace the heating element after they are cool.
- Remove screws of the handle.
- Remove the fan, and disconnect the connecting wire of the heating element, pay attention to the position for the connecting wire.
- Take out the heating element and the mica paper from the steel tube, and do not break the mica paper.
- Use the mica paper to pack up the heating element, insert it in the steel tube, and the installation of the heating element should be on the designated position, and do not let it touch the ground wire.
- Connect the connecting wire of the heating element according to the original position.
- Install the handle and screw down the screws.
CAUTION!
- When changing the heating element, don't damage the grounding wire of the steel tube.
- When changing, don't damage the connecting wire of the punp.
- When you install the handle shells back, the fixed pole of the handle shells must be in the fixed hole of the steel tube.
Back to the section
|
|


